برق، الکترونیک، الکتروتکنیک، مکاترونیک، پزشکی، کشاورزی

برق، الکترونیک، الکتروتکنیک، مکاترونیک، پزشکی، کشاورزی و

برق، الکترونیک، الکتروتکنیک، مکاترونیک، پزشکی، کشاورزی

برق، الکترونیک، الکتروتکنیک، مکاترونیک، پزشکی، کشاورزی و

داده هایی در مورد برق، الکترونیک، الکتروتکنیک، مکاترونیک، پزشکی، کشاورزی و

تبلیغات
آخرین نظرات

۶ مطلب با کلمه‌ی کلیدی «بوت لودر آردوینو» ثبت شده است

بوت لودر آردوینو-زبان اصلی از اردوینو.سی سی

ShahBaz | جمعه, ۲۷ آذر ۱۳۹۴، ۱۱:۱۹ ب.ظ

Burning the Bootloader

To burn the bootloader, you'll need to buy an AVR-ISP (in-system programmer), USBtinyISP or build aParallelProgrammer. The programmer should be connected to the ICSP pins (the 2 by 3 pin header) - make sure you plug it in the right way. The board must be powered by an external power supply or the USB port.

Make sure you have the right item selected in the Tools | Board menu. Then, just launch the appropriate command from the Tools > Burn Bootloader menu of the Arduino environment. Burning the bootloader may take 15 seconds or more, so be patient.

https://www.arduino.cc/en/Hacking/Bootloader?from=Tutorial.Bootloader

  • ShahBaz

Bootload an ATmega328 Microcontroller

ShahBaz | يكشنبه, ۲۶ مهر ۱۳۹۴، ۰۴:۱۶ ب.ظ

Bootload an ATmega328 Microcontroller

Bootloading Configuration

Bootloading Configuration

This page adds to any of the Arduino on a Breadboard projects out there – there are a number of great resources on building your own Breadboard-based Arduino. I have documented my own (see here), which I used for various projects. I then found that I was struggling to program some of the boards I made, usually when I switched suppliers. After some investigation, I found that:

1. Not all suppliers provide microcontrollers with a Bootloader (even though they may say they do)

2. Not all ATmega328s are equal

A bootloader, simply put, is a programme that sits on the chip and manages the upload of your sketches onto the chip. There are plenty of bootloading resources out there, but I struggled to find a single one that pulled everything together in a way that made sense to me. Here is the process that I followed.

Step 1: The parts


Step 2: The Approach

We’re going to use the Arduino UNO to bootload the ATmega328 that is sitting on the Arduino-on-a-Breadboard. This is fairly straightforward if you have an ATmega328P-PU, but needs an extra step for an ATmega328-PU. I’ll tackle the differences later on.

Step 3: Program your Arduino UNO as an ISP

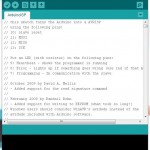
The Arduino ISP Sketch

The Arduino ISP Sketch

We need to program the Arduino UNO to act as a an ISP (In-System Programmer), so that it can burn the bootloader onto the Breadboard chip.

  1. Open the Arduino IDE
  2. Open the ArduinoISP sketch (under File, Examples)
  3. If you’re using version 1.0 of the IDE:
    • search for “void heartbeat”
    • Change the line that reads:
    • delay(40); to delay(20);
  4. Connect your UNO to the PC, making sure it’s not connected to the Arduino on a Breadboard.
  5. Ensure your UNO is selected under the Boards menu option, and upload the sketch.

Step 4: Connect your ATmega328P

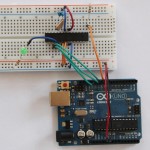
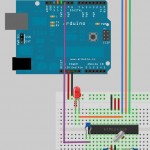
Bootloading Connections

Bootloading Connections

The ATmega328 pin mapping

The ATmega328 pin mapping

Now connect your ATmega to your UNO as follows:

  • UNO 5v —> ATmega pin 7 (VCC)
  • UNO GND —> ATmega pin 8 (GND)
  • UNO pin 10 —> ATmega pin 1 (RESET)
  • UNO pin 11 —> ATmega pin 17 (MOSI)
  • UNO pin 12 —> ATmega pin 18 (MISO)
  • UNO pin 13 —> ATmega pin 19 (SCK)

Make sure that you don’t have anything else connected to the ATmega pins used above.

Step 5: Which ATmega328 are you using?

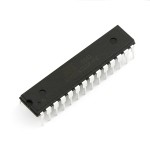
The ATmega328P-PU

The ATmega328P-PU

I learnt the hard way that there is more than one type of ATmega328. The two variants that are of interest to us are the ATmega328-PU and theATmega328P-PU.

To decode the naming conventions:

  •  -PU means that the chips are in a PDIP package, the format we need for our breadboard.
  • The 328P is a picoPower processor, designed for low power consumption, and is the chip used on the Arduino boards.

The 328 does not have picoPower technology, and is not used on the Arduino boards – as a result it is not explicitly supported by the Arduino IDE.

What this means is that we can easily bootload the ATmega328P, but not the ATmega328. This was a problem for me, as I had bought a load of ATmega328-PU chips from a supplier that had listed them at ATmega328P-PU.

Workaround: Scroll to the end of this page if you need the workaround to get the ATmega328-PU working.

Step 6: Bootload the ATmega328

To bootload your chip, open the Arduino IDE:

From the Tools menu:

  • under the Board option choose Arduino UNO
  • under the Serial Port option ensure the correct port is selected
  • under the Programmer option choose Arduino as ISP

To burn the Bootloader, choose Burn Bootloader from the Tools menu.

You should see a message “Burning bootloader to I/O Board (this may take a minute)”

Burning the Bootloader

Burning the Bootloader

Once the bootloader has been burned, you’ll see a message confirming the success.

Bootloader Burning Done

Bootloader Burning Done

Congratulations: You’re now ready to load sketches onto your ATmega microcontroller!

Workaround for the ATmega328-PU

If you try to bootload an ATmega328-PU, you’ll get a message something along the lines of:

avrdude: Device signature = 0x1e9514

avrdude: Expected signature for ATMEGA328P is 1E 95 0F

Double check chip, or use -F to override this check.

You could also get a more exciting version:

avrdude: Yikes! Invalid device signature.

Yikes AVRDude Error

Yikes! AVRDude Error

What does this all mean?

Each microcontroller has a signature – a unique code that identifies its model. When you bootload a chip (or even upload a sketch) the Arduino IDE checks that the chip selected matches the type it’s connected to – this is to protect the mcrocontroller from user error – if this check wasn’t in place and you accidentally select the wrong controller in the IDE and burn the bootloader you could “brick” your controller.

Even though the ATmega328-PU in essence functions in the same way as the ATmega328P-PU, it has a different signature, and one that isn’t recognised by the Arduino IDE. (Behind the Scenes: The Arduino IDE actually uses a utility called AVRDUDE to programme the chips, so you’ll see error messages from avrdude. (Adafruit have a good tutorial on avrdude)


The ATmega328 Bootloading Workaround

Find and open the folder that the Arduino IDE is installed in, then:

  •  open the subfolder ..\hardware\tools\avr\etc
  • Make a backup copy of the file avrdude.conf
  • Open the file avrdude.conf in a text editor – I use the cross-platform Geany as it formats the file better than Notepad.
  • Search for: 0x1e 0x95 0x0F (this is the ATmega328P signature)
  • Replace it with: 0x1e 0x95 0x14 (this is the ATmega328 signature)
  • Save the file
  • Restart the Arduino IDE
  • Continue with the rest of the steps, and once bootloading is complete restore the backup copy you made.

You are now good to bootload ATmega328-PU microcontrollers as well!

Note: A number of people, including myself, have tried to add an ATmega328 entry into the avrdude.conf and boards.txt. This process will allow you to use avrdude from the command-line (quite daunting), but the Arduino IDE will not compile.

Uploading Sketches

ATmega328P-PU
You can leave your setup as it is, and use the Arduino UNO to upload sketches to your newly bootloaded ATmega (File, Upload using Programmer).
ATmega328-PU
The IDE will notice that the signature isn’t valid – so you’ll have to either alter the avrdude.conf file again or use an FTDI board to upload. I prefer using an FTDI board anyway as it doesn’t take my UNO out of circulation and is quicker to connect.

  • ShahBaz

روش پروگرام کردن بوت لودر arduino

ShahBaz | شنبه, ۲۵ مهر ۱۳۹۴، ۰۹:۰۸ ب.ظ

روش پروگرام کردن بوت لودر arduino

روش پروگرام کردن بوت لودر arduino

برای نوشتن بوت لودر آردوینو دو روش وجود دارد:

۱٫ روش اول با استفاده از برد های Arduino که معمولا برد Uno می باشد که در این سایت یه آموزش با میکروکنترلر ATmega8 گذاشته ام.

۲٫ روش دوم با استفاده از پروگرامرهای SPI میباشد که من با STK500 و AVR Studio 4 این کار را انجام داده ام و آموزش آن را به صورت تصویری در زیر می توانید ببینید.

http://turbodigital.ir/?p=40


  • ShahBaz

بوت لودر ATmega8 در Arduino

ShahBaz | شنبه, ۲۵ مهر ۱۳۹۴، ۰۸:۲۸ ب.ظ

ATmega8 bootloader in arduino

بوت لودر ATmega8 در Arduino

به همره قسمت خطایابی در انتهای همین مطلب

به نام خدا

همان طور که می دانید در بردهای Arduino برد Atmega8 وجود ندارد ولی این امکان وجود دارد با نوشتن یک بوت لودر در ATmega8 به راحتی با این میکروکنترلر در Arduino برنامه نویسی کرد. حالا من آموزش کاملی رو واستون می ذارم.

ابتدا مواد لازم:

۱. Arduino ورژن ۱٫۰٫۵ (من با این ورژن تست زدم ولی احتمالا بالاتر هم جواب بده)

۲.ATmega8A-PU (نگران نباشید با دیگر سری ها هم جواب می دهد ولی واسه شروع از این استفاده کنید که شک یا شبه ایی پیش نیاد)

۳. دو/۲ عدد برد Arduino Uno (اول به این شکل انجام بدید تا حساب کار دستتون بیاد بعد برید روی Breadboard)

http://www.4shared.com/rar/GMfMPXrkce/ATmegaBOOT-prod-firmware-2009-.html

اول از هر کاری به مسیر hardware/arduino/bootloaders/atmega8 بروید سپس بررسی کنید فایل ATmegaBOOT-prod-firmware-2009-11-07.hex در فولدر جاری باشد اگر نبود فایل رو از لینک بالا دانلود کنید و در مسیر فوق کپی کنید و بعد از حالت فشرده خارج کنید.

سپس در لینک زیر فایل فشرده رو دانلود کنید سپس از حالت فشرده خارج کنید و دو تا فایل pins_arduino.h و pins_arduino.c رو در مسیر hardware/arduino/cores/arduino کپی کنید.

http://www.4shared.com/rar/MnaI7s-Eba/pins_arduino.html

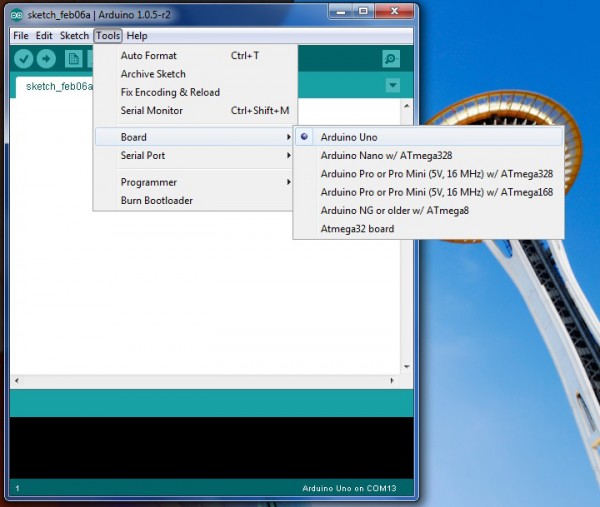
خوب حالا می رویم سراغ سخت افزار ها. دو عدد برد Arduino Uno یکی رو اول به کامپیوتر وصل کنید و سپس Arduino رو اجرا کنید و مطابق عکس برد Arduino Uno رو انتخاب کنید و بعد پورت سریال رو هم انتخاب کنید.
bootloader (1)

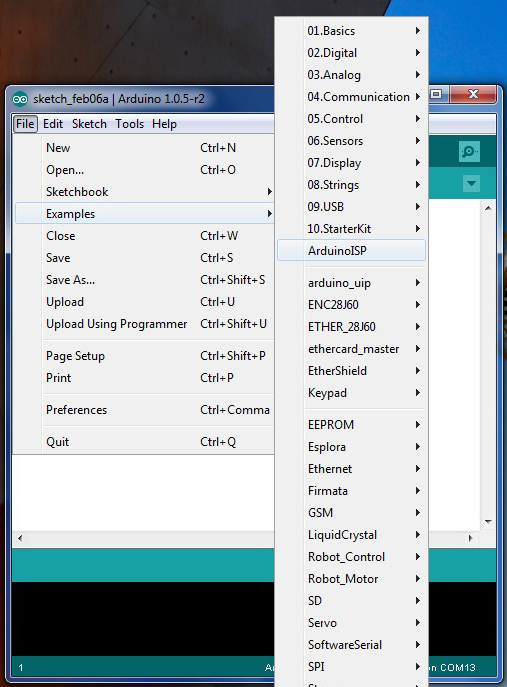
حالا مطابق عکس پایین در نوار ابزار بر روی File کلیک کنید و سپس در Examples بر روی ArduinoISP کلیک کنید حالا برنامه رو Upload کنید.
bootloader (2)

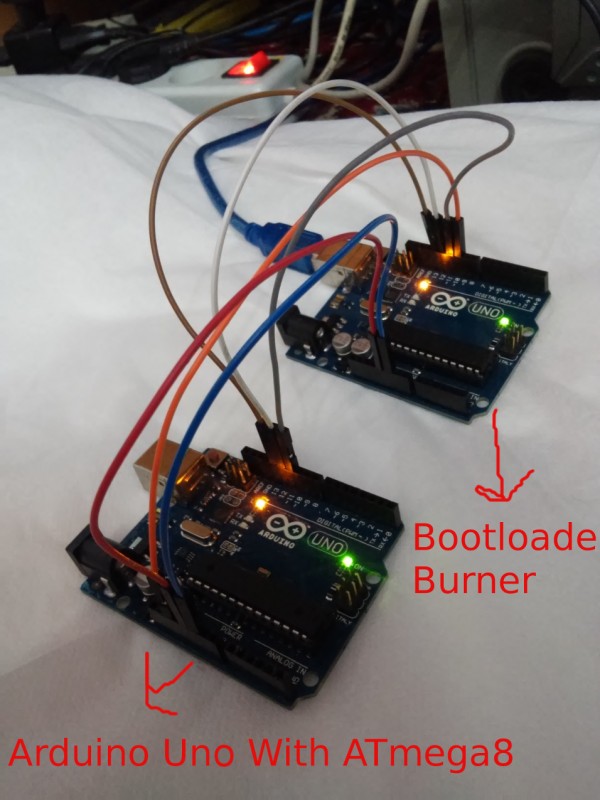
الان Bootloader Burner آماده است. خوب حالا برد Arduino Uno بعدی رو باید میکروکنترلر ATmeag328P رو از روش بردارین و یک ATmega8 جایگزین کنید.نگران نباشد چون ترتیب پایه های ATmega328P و ATmega8 دقیقا مثل هم هستند. بعد از انجام این کار دقیقا مطابق عکس پایین اتصالات رو برقرار می کنید.اما قبل به مسیر Arduino/hardware/arduino برید و  فایل boards.txt باز کنید. دنبال Arduino NG or older w/ ATmega8 بگردید حالا باید فیوز بیت های میکرو رو نتظیم کنید دو تا خط مثل زیر واسه میکرو تعریف شده

atmega8.bootloader.low_fuses=0xdf
atmega8.bootloader.high_fuses=0xca
بایت کم ارزش روی df و پر ارزش روی ca تنظیم کنید از آدرس Engbedded AVR Fuse Calculator هم می توانید استفاده کنید.
bootloader (3)


Bootloader Burner                            Arduino Uno With ATmega8

۵V+ ========================> +5V

GND ========================> GND

SCK =========================> SCK  پایه 13

MISO ========================> MISO  پایه 12

MOSI ========================> MOSI  پایه 11

SS ========================> Reset  پایه 10


*پایه Reset در بخش پاور برد آردوینو قبل از پایه 3.3 ولت هست.


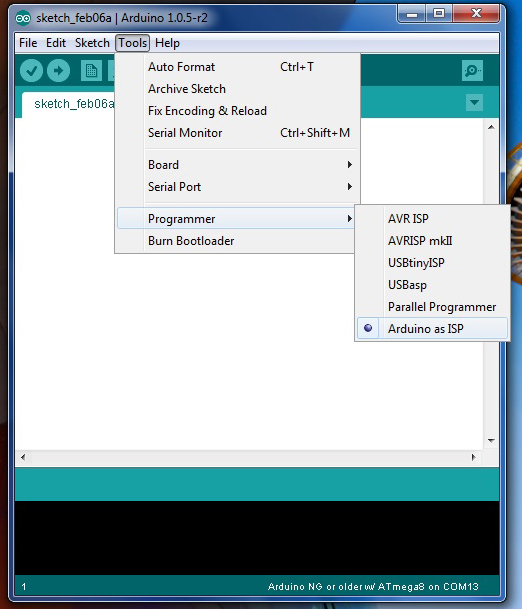
خوب حالا بعد از اتصالات می ریم سراغ نوشتن بوت لودر. ابتدا کابل USB رو به بردی که به عنوان Bootloader Burner آماده کردیم متصل می کنیم و مطابق عکس پایین Programmer رو بر روی Arduino as ISP قرار می دهیم.
bootloader (4)

و بعد مطابق عکس پایین برد Arduino NG or order w/ATmega8 رو انخاب می کنیم و بعد در نوار ابزار بر روی Tools کلیک کنید و بروی Burn Bootloader کلیک کنید. LED های TX و RX بر بروی برد Arduino Uno که به عنوان Bootloader Burner آماده شده روشن می شوند و خاموش می شوند و بعد از زمان خیلی کوتاه دوباره روشن می شوند و عملیات نوشتن Bootloader آغاز می شود. و با پیغام تکمیل شدن نوشتن بوت لودر توسط کامپایلر به پایان می رسد.
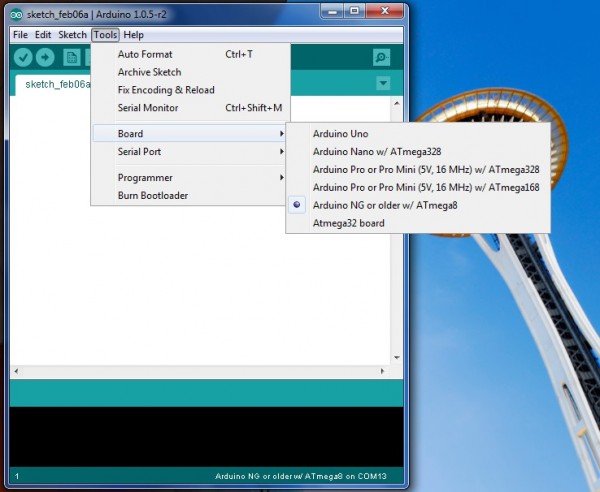
bootloader (5)

حالا کابل USB رو به بردی که ATmeag8 رو جایگزین کردید متصل کنید و بعد پروژه چراغ چشمک زن رو Upload کنید و لذت ببرید.


خطاها:

سلام
من طبق کارهای شما پیش رفتم ولی موقع پروگرام کردن خطای

“efuse” memory type not defined for part “ATMEGA8″
میده
مشکل از چیه؟
در ضمن من از نسخه ۱٫۵٫۶ اردوینو استفاده میکنم.
با تشکر

-----------------------------------------------------------------------------------------------------------

سلام دوباره
من اردوینو ۱٫۰۵ رو نصب کردم اما اینبار خطای

core.a(main.cpp.o): In function main':C:\Program Files\Arduino\hardware\arduino\cores\arduino/main.cpp:11: undefined reference to setup’
C:\Program Files\Arduino\hardware\arduino\cores\arduino/main.cpp:14: undefined reference to `loop’

رو میده…


پاسخ:

باید در نوار ابزار بر روی Tools کلیک کنید و بروی Burn Bootloader کلیک کنید. احتمالا شما روی Upload کلیک کرده اید.

-----------------------------------------------------------------------------------------------------------


سلام مجدد؛
بعد از باز و بستن برنامه همه چیز به خوبی پیش رفت و بوت لودر آپلود شد.

فقط یه نکته و اونم اینکه بعد از اینکه برد آنو با میکرو اتمگ ۸ بوت شد از این به بعد برای ریختن برنامه داخل اون باید در قسمت “برد” به جای “اردوینو انو” باید گزینه “Arduino NG or order w/ATmega8 ” رو انتخاب کرد.

مدت زمان بوت شدن برنامه ال ای دی چشمک زن در این بردها ممکن هست نسبت به بردهای اردوینو با اتمگ 328 بیشتر باشه..مثلا شاید توی اتمگ328 بلافاصله بعد از آپلود برنامه چشمک زن ال ای دی شروع به چشمک زدن بکنه اما توی اتمگ 8 یه چند ثانیه ای تاخیر داشته باشه...که زیاد مهم نیست.


دقت شود بعد از اینکه بوت لودر داخل برد آردوینو با اتمگ 8 ریختید؛، دقت کنید که سیم های +5 و زمین و پایه ریست رو حتمن خارج کنید. و بعد برنامتون رو بریزید در غیر این صورت با خطا مواجه میشید.


با تشکر


منبع:

http://turbodigital.ir/?p=57

  • ShahBaz

بوت لودر آردوینو

ShahBaz | چهارشنبه, ۶ خرداد ۱۳۹۴، ۰۹:۲۰ ق.ظ
اطلاعات فایل
  • ارسال شده: فرو ۱۲ ۱۳۹۴ ۰۳:۴۸ بعد از ظهر
  • آخرین به روزرسانی: فرو ۱۲ ۱۳۹۴ ۰۳:۴۸ بعد از ظهر
  • حجم فایل: 863bytes
  • دفعات بازدید: 152
  • تعداد دریافت ها: 17

دریافت


 بوت لودر آردوینو

- - - - -


تصویر
فایل هگز دریافتی را بوسیله پروگرامر بر روی یک Atmega328 پروگرام کنید
فیوزبیت ها به شکل زیر تنظیم شود:

low_fuse=0xFF
high_fuse=0xDE
extended_fuse=0x05
unlock_bit=0x3F
lock_bit=0x0F

این تنظیمات مربوط به برد آردوینو UNO میباشد


  • ShahBaz

ساخت برد اردینو

ShahBaz | چهارشنبه, ۶ خرداد ۱۳۹۴، ۰۹:۱۷ ق.ظ

با nanino برد آردوینو خود را بسازید!

ش

۲ پاسخ

  1. parsafar

    سلام خسته نباشین.موقع پروگرام فرکانس چقدر باشه؟ای کاش توضیحات کلی برای آموزش این مدار میزاشتین مثلا شناسایی پایه ها ولتاژ کاری و نحوه کارکرد باهاش و حتی انتخاب کدام برد از داخل فایل pdf .
    ونحوه چیدمان قطعات روی برد

    ممنون

    • Pouria

      سلام وقت بخیر ،
      فیوزبیت های مورد نیاز که فرکانس و بقیه موارد میکرو تنظیم میشه در صفحه دریافت بوت لودر قرار گرفته
      محل قرار گیری قطعات و پایه های برد در صفحه دریافت pcb به صورت تصویری قرار داره
      این برد تنها یک pcb یک لایست و آموزش آردوینو در این پست نمیگنجه

  • ShahBaz