برق، الکترونیک، الکتروتکنیک، مکاترونیک، پزشکی، کشاورزی

برق، الکترونیک، الکتروتکنیک، مکاترونیک، پزشکی، کشاورزی و

برق، الکترونیک، الکتروتکنیک، مکاترونیک، پزشکی، کشاورزی

برق، الکترونیک، الکتروتکنیک، مکاترونیک، پزشکی، کشاورزی و

داده هایی در مورد برق، الکترونیک، الکتروتکنیک، مکاترونیک، پزشکی، کشاورزی و

تبلیغات
آخرین نظرات

۸ مطلب با کلمه‌ی کلیدی «دانلود آموزش فارسی» ثبت شده است

برنامه عملیاتی مدارس

ShahBaz | سه شنبه, ۲۱ مهر ۱۳۹۴، ۰۷:۰۵ ب.ظ

فایل بافرمت ورد و 9 صفحه با قالب بندی مناسب.
دارای سرفصل های زیر است:
برنامه عملیاتی محور توانمندسازی و مشارکت نیروی انسانی
برنامه عملیاتی محوراستقرار نظام یادهی –یادگیری  ( کیفیت بخشی به آموزش ) 
برنامه عملیاتی محوربرنامه های مکمل ، فوق برنامه پرورشی  

برنامه عملیاتی مدارس

کد محصول : barname_Amaliati
قیمت : 3,000 تومان
0
از 0 نظر

جدول تحلیل محیطی مدارس برنامه عملیاتی محور توانمندسازی و مشارکت نیروی انسانی


تعدادی از صفحات:
جدول تحلیل محیطی

محور : توانمند سازی و مشارکت نیروی انسانی
مستندات قانونی:
سند تحول فصل 6 بند 8-10-11-13
  فصل 5 سند تحول
 اهداف علمی آموزشی و اجتماعی از کتاب مجموعه مصوبات شورای عالی آموزش و پرورش
برنامه درس ملی ص 29 حوزه 6
سند تحول ص 27 بند 7-11
اهمیت و ضرورت :
تربیت انسانی موحده مومن، معتقد به معاد و آشنا و متعهد به مسئولیت ها و وظایف در برابر خدا، خود، دیگران و طبیعت،حقیقت جو، عاقلریال عدالت خواه، صلح جو، ظلم ستیز، جهادگر، شجاع و ایثارگر و وطن دوست، مهرورز، جمع گرا، جهانی اندیش، ولایت مدار، منتظر و تلاشگر در جهت تحقق حکومت عدل جهانی، با اراده و امیدوار، خودباور و دارای عزت نفس، امانتدار، دانا و توانا، پاکدامن و باحبا، انتخابگر و آزاد اندیش، متعلق به اخلاق اسلامی، خلاق و کارآفرین و مقتدر و ماهر، سالم و بانشاط، قانون مدار و نظم پذیر و آماده ی ورود به زندی شایسته فردی، خانوادگی و اجتماعی بر اساس نظام معیار اسلامی جزء ضرورت جامعه است.
قوت ها :
شناسایی دانش آموزان مستعد-اشتراک 100% مجلات رشد-علاقه مند به مطالعه کتاب-همکاری همکاران در گروه های درسی مجتمع و شورای معلمان-انگیزه بالای همکاران جهت فراگیری علوم جدید و استفاده از تجهیزات و  فناوری- انعطاف پذیر بودن همکاران- مطالعه بالای همکاران و غنی سازی اطلاعاتشان-استفاده از رسانه های مختلف دانش آموازان و همکاران-مشارکت دانش آموزان و همکاران در نمایشگاه های مختلف درون مدرسه
فرصت ها :
استفاده از مهرات بعضی از اولیا-
غنی سازی اوقات فراغت دانش آموزان در موسسات خصوصی توسط اولیا-
همکاری مداریس همجوار با مدرسه-
کمک مالی اولیا به مدرسه- استفاده از طبیعت روستا برای آموزش بعضی از مطالب- خلوت بودن و عدم وجود صداهای مزاحم- استفاده از کارشناسان مجرب- همکاری واحد آموزش اداره و گروه های هدف درسی با همکاران
ضعف ها :
نبود کارگاه آموزشی در مدرسه- نبود کتابخانه و آزمایشگاه در مدرسه- نبود تجیزات کافی در کلاس درس-نبود بانک اطلاعاتی مناسب در مدرسه-عدم آگاهی همکاران با سایت های آموزش یا در اختیار نداشتن این سایت ها- چندپایه بودن مدرسه- مدیر آموزگار بودن مدرسه-نبود محتوای مناسب آموزشی در مدرسه به صورت الکترونیک


تهدیدها :
نبود منابع مالی کافی- نداشتن مهارت مناسب بعضی از اولیا-نبود موزه و نمایشگاه های مختلف در منطقه- عدم دسترسی همکاران به مرکز تحقیقاتی معلمان استاد بعلت مسافت زیاد- عدم مرکز تحقیقاتی و پژوهشی در منطقه-ملموس نبودن بعضی از مفاهیم کتاب برای دانش آموزان به علت گویش محلی-در دسترس نبودن بعضی امکان مثل مترو، چهار راه و...- توجیه نبودن خیرین منطقه برای کمک به مدرسه
راهبرد
 
فعالیت وضعیت موجود  
برنامه عملیاتی محور توانمندسازی و مشارکت نیروی انسانی
وضعیت مطلوب
زمانبندی اجرا اعتبار مسوول پی گیری اقدامات اجرایی
 
 
افزایش نقش راهنمایی و تربیتی


شناسایی دانش آموزان لازم التوجه آموزشی ( نیازهای ویژه ) و برنامه ریزی جهت رفع مشکل با هدف انسداد مبادی بیسوادی 70% 100% از ابتدا تا انتهای مهرماه 2000000 معلمان توجه به سنجش دانش آموزان و آموزش ویژه -تهیه فرم برای اولیا و شناسایی
آن ها و معرفی به مراکز برگزار کننده دوره آموزشی
شناسایی دانش آموزان مستعد در زمینه های مختلف و برنامه ریزی در راستای استفاده از توانمندی ها 70% 100% از ابتدا تا انتهای مهرماه 2000000 معلمان استفاده از استعدادها و برنامه ریزی مناسب-ایجاد زمینه مناسب تشکیل نمایشگاه های مختلف و برگزاری مسابقات
بررسی میزان بهره گیری از نظرات و پیشنهادات
( دانش آموزان ، اولیا و کارکنان )
80% 100% در طول سال 1000000 انجمن
 معاون
تشکیل صندوق پیشنهادات و تشکیل شوراهای مختلف


برنامه عملیاتی مدارس

کد محصول : barname_Amaliati
قیمت : 3,000 تومان
0
از 0 نظر

جدول تحلیل محیطی مدارس برنامه عملیاتی محور توانمندسازی و مشارکت نیروی انسانی

  • ShahBaz

آموزش راه اندازی ماژول وایرلس NRF24L01

ShahBaz | دوشنبه, ۶ مهر ۱۳۹۴، ۱۲:۱۳ ب.ظ

مقدمه:در این پروژه قصد بررسی عملکرد ماژول وایرلس NRF24L01 را داریم.برای این منظور پروژه ای بدین صورت تعریف شده است:با استفاده از یک پتانسیومتر که به فرستنده متصل است یک سروموتور در طرف گیرنده را به حرکت درآوریم به این صورت که میزان حرکت سروموتور متناسب با حرکت پتانسیومتر باشد.

در واقع نام این پروژه " کنترل سروموتور بوسیله پتانسیومتر وایرلس " می باشد.

فهرست موضوعی:مقدمه¡سخت افزار مورد نیازکتابخانه ماژول وایرلس NRF24L01اتصال ماژول وایرلس nRf24 به بردآردوینوویژگی های ماژول NRF24L01نکات مهممشخصات سروو موتوراتصال سروموتور به آردوینو گیرندهاتصال پتانسیومتر به فرستندهنتیجه​
 
در فایلی که برای دانلود قرار داده شده علاوه بر توضیحات که در قالب یک PDF تهیه شده، کدها آردوینو به همراه کتابخانه NRF24L01 قرار داده شده است.


دانلود آموزش فارسی  راه اندازی ماژول وایرلس NRF24L01

+کدهای گیرنده و فرستنده+کتابخانه+پاورپوینت توضیحات و شماتیک 

در قالب یک پروژه کاملا عملی

  • ShahBaz

RadioLink-Joystick-To-Servos

ShahBaz | سه شنبه, ۲۷ مرداد ۱۳۹۴، ۰۶:۰۰ ب.ظ

دانلود آموزش فارسی  راه اندازی ماژول وایرلس NRF24L01

+کدهای گیرنده و فرستنده+کتابخانه+پاورپوینت توضیحات و شماتیک 

در قالب یک پروژه کاملا عملی


RadioLink-Joystick-To-Servos


UNDER CONSTRUCTION - July 2014: If you try this version, please send problems, feedback, suggestions to terry@yourduino.com

- WHAT IT DOES:
  • Reads Joystick Analog Values on A0, A1 and transmits them over an nRF24L01 Radio Link, using the Radiohead library.
  • Receives Joystick position values from an nRF24L01 Radio Link, positions X and Y Servos (Usually on a Pan-Tilt platform). May point a small laser.

Uses nRF24L01 Radios like these.


The TRANSMIT Software Sketch:

(Copy and paste into a blank Arduino IDE page)
/* YourDuinoStarter Example: TRANSMIT nRF24L01 Joystick data to Pan Tilt Over Radio.
   QUESTIONS? terry@yourduino.com
 - WHAT IT DOES: Reads Joystick Analog Values on A0, A1 and transmits
   them over a nRF24L01 Radio Link, using the Radiohead library.
 - TODO! Send the Joystick push-down click to turn Laser on and off
 - SEE the comments after "//" on each line below
 - CONNECTIONS: nRF24L01 Modules See:
 http://arduino-info.wikispaces.com/Nrf24L01-2.4GHz-HowTo
   1 - GND
   2 - VCC 3.3V !!! NOT 5V
   3 - CE to Arduino pin 8
   4 - CSN to Arduino pin 10
   5 - SCK to Arduino pin 13
   6 - MOSI to Arduino pin 11
   7 - MISO to Arduino pin 12
   8 - UNUSED

      -
   Analog Joystick or two 10K potentiometers:
   GND to Arduino GND
   VCC to Arduino +5V
   X Pot to Arduino A5
   Y Pot to Arduino A4
   Click Button to pin 4

   -V2.00 7/12/14  by Noah King
   Based on examples at http://www.airspayce.com/mikem/arduino/RadioHead/index.html
*/

/*-----( Import needed libraries )-----*/
// SEE http://arduino-info.wikispaces.com/Arduino-Libraries  !!
// NEED the RadioHead Library installed!
// http://www.airspayce.com/mikem/arduino/RadioHead/RadioHead-1.23.zip
#include <RHReliableDatagram.h>
#include <RH_NRF24.h>
#include <SPI.h>


/*-----( Declare Constants and Pin Numbers )-----*/
#define JoyStick_X_PIN     A5  //Pin Numbers
#define JoyStick_Y_PIN     A4
#define ClickPIN           4

#define CLIENT_ADDRESS 1      // For Radio Link
#define SERVER_ADDRESS 2


// Create an instance of the radio driver
RH_NRF24 RadioDriver;

// Create an instance of a manager object to manage message delivery and receipt, using the driver declared above
RHReliableDatagram RadioManager(RadioDriver, CLIENT_ADDRESS);// sets the driver to NRF24 and the client adress to 1

/*-----( Declare Variables )-----*/
uint8_t joystick[2];  // 2 element array of unsigned 8-bit type, holding Joystick readings

// Predefine the message buffer here: Don't put this on the stack:
uint8_t buf[RH_NRF24_MAX_MESSAGE_LEN];    // Actually: 28 bytes (32 minus 4 byte header)

void setup()  /****** SETUP: RUNS ONCE ******/
{
  // begin serial to display on Serial Monitor. Set Serial Monitor to 115200
  // See http://arduino-info.wikispaces.com/YourDuino-Serial-Monitor
  Serial.begin(115200);

  // NOTE: pinMode for Radio pins handled by RadioDriver
  if (!RadioManager.init())   // Defaults after init are 2.402 GHz (channel 2), 2Mbps, 0dBm
    Serial.println("init failed");

  pinMode(ClickPIN, INPUT);  //Not really needed: pins default to INPUT
}


void loop() /****** LOOP: RUNS CONSTANTLY ******/
{
  //Read the joystick values, scale them to 8-bit type and store them in the joystick[] array.
  Serial.println("Reading joystick values ");
  // Take the value of Joystick voltages which are 0 to 1023 (10 bit), and convert them to 0 to 255 (8 bit)
  joystick[0] = map(analogRead(JoyStick_X_PIN), 0, 1023, 0, 255);
  joystick[1] = map(analogRead(JoyStick_Y_PIN), 0, 1023, 0, 255);

  //Display the joystick values in the serial monitor.
  Serial.print("x:");
  Serial.print(joystick[0]);
  Serial.print("y:");
  Serial.println(joystick[1]);

  Serial.println("Sending Joystick data to nrf24_reliable_datagram_server");
  //Send a message containing Joystick data to manager_server
  if (RadioManager.sendtoWait(joystick, sizeof(joystick), SERVER_ADDRESS))
  {
    // Now wait for a reply from the server
    uint8_t len = sizeof(buf);
    uint8_t from;
    if (RadioManager.recvfromAckTimeout(buf, &len, 2000, &from))
    {
      Serial.print("got reply from : 0x");
      Serial.print(from, HEX);
      Serial.print(": ");
      Serial.println((char*)buf);
    }
    else
    {
      Serial.println("No reply, is nrf24_reliable_datagram_server running?");
    }
  }
  else
    Serial.println("sendtoWait failed");

  delay(500);  // Wait a bit before next transmission
}


The RECEIVE Software Sketch:

(Copy and paste into a blank Arduino IDE page)
/* YourDuinoStarter Example:RECEIVE nRF24L01 Joystick data to control Pan Tilt Servos Over Radio.
   QUESTIONS? terry@yourduino.com
 -WHAT IT DOES:
  -Receives Joystick Analog Values over a nRF24L01 Radio Link, using the Radiohead library.
  - Sends Joystick position to 2 servos, usually X,Y to pan-tilt arrangement
  - TODO! Send the Joystick push-down click to turn Laser on and off
 - SEE the comments after "//" on each line below
 - CONNECTIONS: nRF24L01 Modules See:
 http://arduino-info.wikispaces.com/Nrf24L01-2.4GHz-HowTo
   1 - GND
   2 - VCC 3.3V !!! NOT 5V
   3 - CE to Arduino pin 8
   4 - CSN to Arduino pin 10
   5 - SCK to Arduino pin 13
   6 - MOSI to Arduino pin 11
   7 - MISO to Arduino pin 12
   8 - UNUSED


   -V2.00 7/12/14 by Noah King
   Based on examples at http://www.airspayce.com/mikem/arduino/RadioHead/index.html
*/

/*-----( Import needed libraries )-----*/
// SEE http://arduino-info.wikispaces.com/Arduino-Libraries  !!
// NEED the SoftwareServo library installed
// http://playground.arduino.cc/uploads/ComponentLib/SoftwareServo.zip
#include <SoftwareServo.h>  // Regular Servo library creates timer conflict!

// NEED the RadioHead Library installed!
// http://www.airspayce.com/mikem/arduino/RadioHead/RadioHead-1.23.zip
#include <RHReliableDatagram.h>
#include <RH_NRF24.h>

#include <SPI.h>

/*-----( Declare Constants and Pin Numbers )-----*/
#define CLIENT_ADDRESS     1
#define SERVER_ADDRESS     2

#define ServoHorizontalPIN 3   //Pin Numbers
#define ServoVerticalPIN   5
#define LaserPIN           6

#define ServoMIN_H  0  // Don't go to very end of servo travel
#define ServoMAX_H  160 // which may not be all the way from 0 to 180. 
#define ServoMIN_V  0  // Don't go to very end of servo travel
#define ServoMAX_V  140 // which may not be all the way from 0 to 180. 


/*-----( Declare objects )-----*/
SoftwareServo HorizontalServo;
SoftwareServo VerticalServo;  // create servo objects to control servos

// Create an instance of the radio driver
RH_NRF24 RadioDriver;

// Create an instance of a manager object to manage message delivery and receipt, using the driver declared above
RHReliableDatagram RadioManager(RadioDriver, SERVER_ADDRESS);

/*-----( Declare Variables )-----*/
int HorizontalJoystickReceived; // Variable to store received Joystick values
int HorizontalServoPosition;    // variable to store the servo position

int VerticalJoystickReceived;   // Variable to store received Joystick values
int VerticalServoPosition;      // variable to store the servo position

uint8_t ReturnMessage[] = "JoyStick Data Received";  // 28 MAX
// Predefine the message buffer here: Don't put this on the stack:
uint8_t buf[RH_NRF24_MAX_MESSAGE_LEN];

//--------------------------------( SETUP Runs ONCE )-----------------------------------------------------
void setup()
{
  pinMode(LaserPIN, OUTPUT);
  digitalWrite(LaserPIN, HIGH); // turn on Laser

  /*-----( Set up servos )-----*/
  HorizontalServo.attach(ServoHorizontalPIN);  // attaches the servo to the servo object
  VerticalServo.attach(ServoVerticalPIN);      // attaches the servo to the servo object


  // begin serial to display on Serial Monitor. Set Serial Monitor to 115200
  // See http://arduino-info.wikispaces.com/YourDuino-Serial-Monitor
  Serial.begin(115200);

  if (!RadioManager.init()) // Initialize radio. If NOT "1" received, it failed.
    Serial.println("init failed");
  // Defaults after init are 2.402 GHz (channel 2), 2Mbps, 0dBm
} // END Setup


//--------------------------------( LOOP runs continuously )-----------------------------------------------------
void loop()
{
  if (RadioManager.available())
  {
 // Wait for a message addressed to us from the client
    uint8_t len = sizeof(buf);
    uint8_t from;
    if (RadioManager.recvfromAck(buf, &len, &from))
 //Serial Print the values of joystick
    {
      Serial.print("got request from : 0x");
      Serial.print(from, HEX);
      Serial.print(": X = ");
      Serial.println(buf[0]);
      Serial.print(" Y = ");
      Serial.println(buf[1]);

      // Send a reply back to the originator client, check for error
      if (!RadioManager.sendtoWait(ReturnMessage, sizeof(ReturnMessage), from))
        Serial.println("sendtoWait failed");
    }// end 'IF Received data Available
  }// end 'IF RadioManager Available
  
  {
    SoftwareServo::refresh();//refreshes servo to keep them updating
    HorizontalJoystickReceived  = buf[1];  // Get the values received
    VerticalJoystickReceived    = buf[0]; 

    // scale it to use it with the servo (value between MIN and MAX)
    HorizontalServoPosition  = map(HorizontalJoystickReceived, 0, 255, ServoMIN_H , ServoMAX_H);
    VerticalServoPosition    = map(VerticalJoystickReceived,   0, 255, ServoMIN_V , ServoMAX_V);
    Serial.print("HorizontalServoPosition : ");
    Serial.print(HorizontalServoPosition);
    Serial.print("  VerticalServoPosition : ");
    Serial.println(VerticalServoPosition);
    // tell servos to go to position
    HorizontalServo.write(HorizontalServoPosition);
    VerticalServo.write(VerticalServoPosition);
    delay(25);                      // wait for the servo to reach the position
  }
}// END Main LOOP


#include <WProgram.h>

RcTractorwizard May 5, 2015

I copied and pasted the receiver sketch into my IDE and I get the error compiling message
Arduino: 1.6.3 (Mac OS X), Board: "Arduino Uno"

In file included from sketch_may04a.ino:28:0:
/Users/Adam/Documents/Arduino/libraries/SoftwareServo/SoftwareServo.h:4:22: fatal error: WProgram.h: No such file or directory
#include <WProgram.h>
^
compilation terminated.
Error compiling.

This report would have more information with
"Show verbose output during compilation"
enabled in File > Preferences.

an suggestions would be greatly appreciated!

best regards
ADAM

دانلود آموزش فارسی  راه اندازی ماژول وایرلس NRF24L01

+کدهای گیرنده و فرستنده+کتابخانه+پاورپوینت توضیحات و شماتیک 

در قالب یک پروژه کاملا عملی

  • ShahBaz

Connecting and programming nRF24L01 with Arduino and other boards

ShahBaz | دوشنبه, ۲۶ مرداد ۱۳۹۴، ۱۰:۱۲ ب.ظ
Discovering Arduino and fascinating world of electronics

Connecting and programming nRF24L01 with Arduino and other boards

Posted: December 4th, 2014 | Author:  | Filed under: howto | Tags: , ,  | 21 Comments »

Connecting nRF24L01 and Arduino

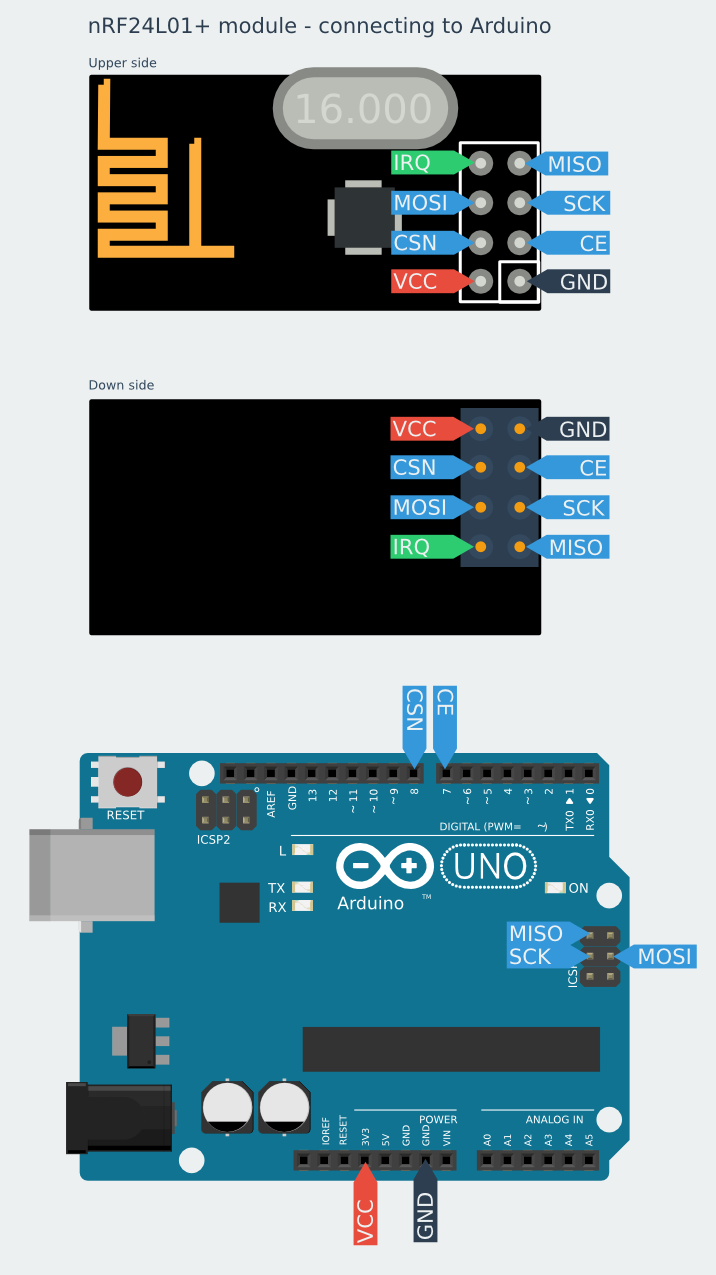
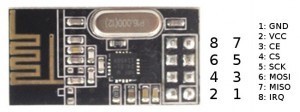
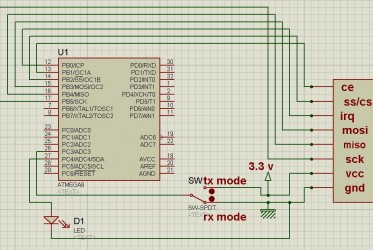
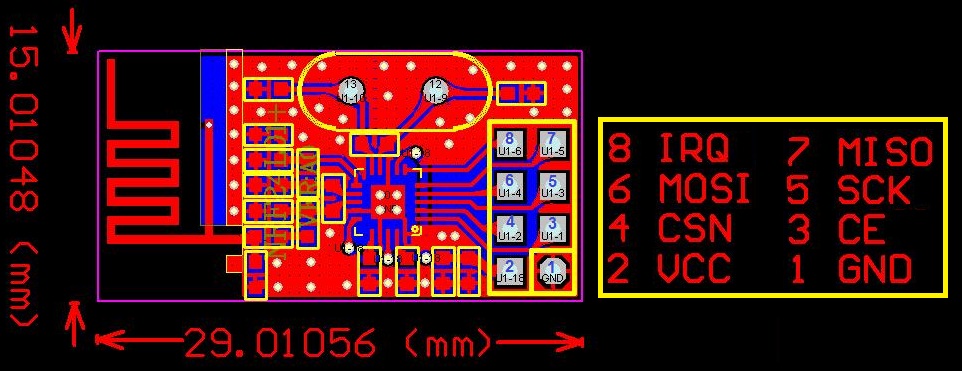
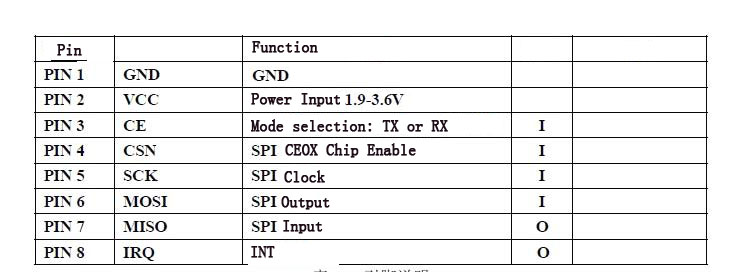
Now, when we know nRF24L01 module pinout we can now connect it to Arduino or some other board. Just connect pins on the same name on Arduino board and nRF24L01 wireless module:

Connecting nRF24L01 and Arduino

Connecting nRF24L01 and Arduino4

Schematic is very universal and  fits for all the Arduino’s: UNO, DUE, MEGA, Leonardo, Yun etc. (Arduino 1.0 (R3) standard, but also with older boards)

SPI signals are in the ICSP connector. For connecting we suggest using female/female jumper wires (type FF). The rest of the signals can be connected using a female/male jumper wires (type FM).

Connect power pins from nRF to Arduino as shown below:

nRF24L01 ARDUINO
VCC 3.3V
GND GND

CE and CSN pins can be connected to any digital pins. Then in RF24 library, you can specify which pins you used. I chose pins 7 and 8 because I will use them in the examples.

On Arduino UNO boards SPI pins are connected with some digital pins. While using modem you most remember that these digital pins won’t be available.

  •     MOSI is connected to the digital pin 11
  •     MISO is connected to the digital pin 12
  •     SCK is connected to the digital pin 13
  •     SS (not used, but also blocks) is connected to the digital pin 10

The Arduino MEGA 1280 and 2560 have a similar situation.

  •     MOSI is connected to the digital pin 51
  •     MISO is connected to the digital pin 50
  •     SCK is connected to the digital pin 52
  •     SS is connected to the digital pin 53

On the Arduino DUE, Yun and Leonardo SPI pins are on ICSP connector, and are independent 

of the digital pins.

دانلود آموزش فارسی  راه اندازی ماژول وایرلس NRF24L01

+کدهای گیرنده و فرستنده+کتابخانه+پاورپوینت توضیحات و شماتیک 

در قالب یک پروژه کاملا عملی

Programming nRF24L01

Having module connected, we need to program it. First program you probably know, we’ll make traditional “Hello World”.

We will make one device (with the modem), will send the string to the other device. The second device will send the received string to a stationary computer and them will display it in the Arduino Serial Port Monitor.

In this project we used RF24 library, which can be found on Github: RF24 library on Github.You only need to click on “Download ZIP” button and it’ll start downloading all necessary things.  You can install the library in Arduino IDE using Sketch-> Import library-> Add library. Another way is to extract the zip file to your Arduino home directory: Arduino/libraries on Linux or Documents/ Arduino/libraries in Windows.

Transmitter program will look like:

#include <SPI.h>
#include <nRF24L01.h>
#include <RF24.h>

RF24 radio(7, 8);

const byte rxAddr[6] = "00001";

void setup()
{
  radio.begin();
  radio.setRetries(15, 15);
  radio.openWritingPipe(rxAddr);
  
  radio.stopListening();
}

void loop()
{
  const char text[] = "Hello World";
  radio.write(&text, sizeof(text));
  
  delay(1000);
}

At the beginning of the sketch we infrom the program that we’ll use libraries.

  • SPI.h – to handle the communication interface with the modem
  • nRF24L01.h – to handle this particular modem driver
  • RF24.h – the library which helps us to control the radio modem

Next, we need to create an object called “radio

RF24 radio(7, 8);

This object represents a modem connected to the Arduino. Arguments 7 and 8 are a digital pin numbers to which signals CE and CSN are connected. If you have connected them to other pins can change this arguments. Then I create a global array called “rxAddr“.

const byte rxAddr[6] = "00001";

In this array we wrote the address of the modem, that will receive data from Arduino. Address has value “00001”, but if you want you can change it to any other 5-letter string. The address is necessary if you have a few modems in the network, thanks to the address, you can choose a particular modem to which you are sending the data. In the “setup” function we call the method “radio.begin ();” . It activates the modem.

Next we call “radio.setRetires(15, 15);” function. It shows how many times the modem will retry to the send data in case of not receiving by another modem. The first argument sets how often modem will retry. It is a multiple of 250 microseconds. 15 * 250 = 3750. So, if the recipient does not receive data, modem will try to send them every 3.75 milliseconds. Second argument is the number of attempts. So in our example, modem will try to send 15 times before it will stop and finds that the receiver is out of range, or is turned off.

The method of “radio.openWritingPipe (rxAddr);” sets the address of the receiver to which the program will send data. Its argument is an array previously made with the receiver address.

The last method in the “setup” function is “radio.stopListening ();“. It switch the modem to data transmission mode.

In the “loop” function, we start with creating a string that we want to send using modem.

const char text[] = "Hello World";

It’s an array of characters/letters to which we assigned a “Hello World” text. Then, using the method of “radio.write (& text, sizeof (text));” we send text through the radio to the modem (the address of the modem was set up earlier using “openWritingPipe”). First argument is an indication of the variable that stores the data to send. That’s why we used  “&” before the variable name, so we can make an indicator from this variable. The second argument is the number of bytes that the radio will take from a variable to be sent. Here we used the function “sizeof ()“, which automatically calculates the number of bytes in a “text” string.

Through this method, you can send up to 32 bytes at one time. Because that is the maximum size of a single packet data modem. If you need confirmation that the receiver received data, the method “radio.write” returns a “bool” value. If it returns “true” , the data reached the receiver. If it returns “false” this data has not been received.


The “radio.write” method blocks the program until it receives the acknowledgment or until you run out of all attempts to transmit established methods set in “radio.setRetires“.


The last part of the “loop” function is “delay (1000);“. It blocks the program for 1000 milliseconds, or one second. It makes the program will sent “Hello World” every second to 

the receiver.

دانلود آموزش فارسی  راه اندازی ماژول وایرلس NRF24L01

+کدهای گیرنده و فرستنده+کتابخانه+پاورپوینت توضیحات و شماتیک 

در قالب یک پروژه کاملا عملی

The receiver

The program of the receiver in the second modem device will look like this:

#include <SPI.h>
#include <nRF24L01.h>
#include <RF24.h>

RF24 radio(7, 8);

const byte rxAddr[6] = "00001";

void setup()
{
  while (!Serial);
  Serial.begin(9600);
  
  radio.begin();
  radio.openReadingPipe(0, rxAddr);
  
  radio.startListening();
}

void loop()
{
  if (radio.available())
  {
    char text[32] = {0};
    radio.read(&text, sizeof(text));
    
    Serial.println(text);
  }
}

The program looks quite similar to the program of the transmitter. First we selected libraries which will be used and then we creates a “radio” object with selected control pins. In the next line you can see a table with the address of the receiver – the same as in the transmitter. At the beginning of the “setup” function we set the object “Serial” for communication Arduino  with the computer.

while (! Serial);

This part is waiting for the Arduino USB port switches to serial COM port when You connect USB cable. That is true for Arduino with ATmega32u4 – like Leonardo, for ATmega328 based boards, which have separate chip for USB/Serial communication Serial is available always. The method of “Serial.begin (9600);” sets the baud rate with the computer via USB / COM.

The next part of the function is to set the nRF24L01 modem. Like before we used “radio.begin ();” method. The next line of the program is “radio.openReadinPipe (0, rxAddr);“, which determines the address of our modem which receives data. The first argument is the number of the stream. You can create up to 6 streams that responds to different addresses. We created only address for the stream number 0. The second argument is the address to which the stream will react to collect the data. In this example we set the address assigned to a “rxAddr” array.

The next step is to enable receiving data via modem using the method “radio.startListening ();“. From that moment the modem waits for data sent to the specified address. In the “loop” function, program performs the following operations. First checks whether any data have arrived at the address of the modem using the method “radio.available ();“. This method returns a “true” value if we received some data, or “false” if no data.

char text[32] = {0};

If the data was received, then it creates a 32-element “char” type array called “text” and filled with zeros (later the program will fill it with the received data). To read the data we use the method “radio.read (& text, sizeof (text));“. The first argument is an indicator of the variable to which you want to save the data received by the modem. To present a variable as an indicator we applied the “&” character in front of its name. The second argument is the amount of data to be stored in a variable. Here, we again have used the “sizeof ()” function, which automatically calculates the size of the “text” array.

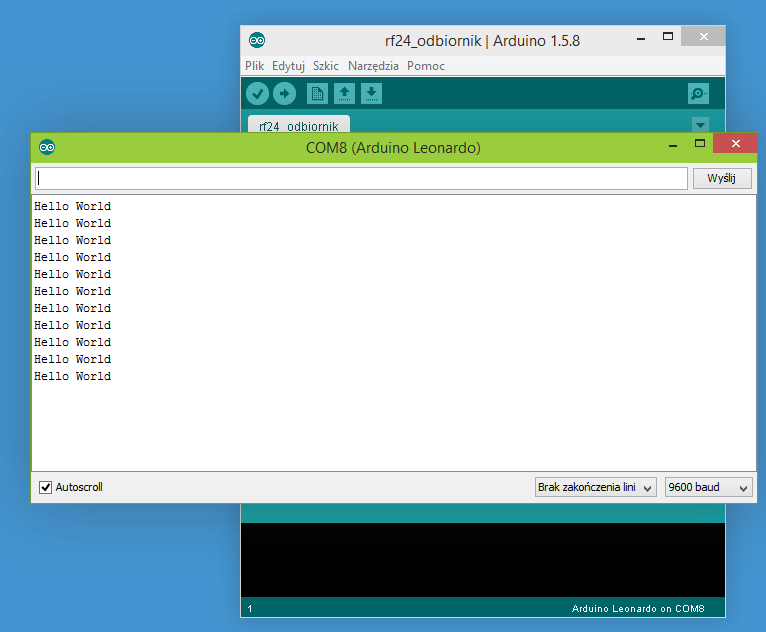
When data is received, it send’s it to the “Serial.println (text);” method. Then the received text is being sent to a computer, where you can see it in the “Serial Port Monitor” using the Arduino IDE.  If you did everything ok and there are no mistakes in connections, you should see the same values in your Serial Port Monitor:

Serial Port Monitor showing communication

Serial Port Monitor showing communication

Stay tuned for next articles. We have connected nRF24L01 with Arduino,  we will coverTeensy 3.1 and smaller µc like ATtiny


دانلود آموزش فارسی  راه اندازی ماژول وایرلس NRF24L01

+کدهای گیرنده و فرستنده+کتابخانه+پاورپوینت توضیحات و شماتیک 

در قالب یک پروژه کاملا عملی


21 Comments on “Connecting and programming nRF24L01 with Arduino and other boards”

  1. 1
    Kumaran said at 16:27 on February 3rd, 2015:

    I was having problem with NRF24 for almost 2 weeks now (Arduino and Raspberry Pi). This is due to many misleading information out there that doesn’t work or confusing or too much information that not required for basic “Hello World” program.

    After spending lots of time trying sample scripts that doesn’t work, I was almost gave up. Finally, found your website with super simple script and worked like charm on first attempt.

    Your graphical guide (clean and clear) helps a lot in getting the pins connected without mistakes.

    Step by step explanation on script lines helps to understand it’s function more clearer. In fact it’s a great “Hello World” tutorial that everyone can get started without issue.

    Now only I know that only few lines of codes needed and it’s enough to test NRF24 “Hello World” program.

    Keep up your good work. Thank you.

  2. 2
    nettigo said at 18:19 on February 3rd, 2015:

    Hi Kumaran,
    We are glad You found these posts useful :)
  3. 3
    Joseph Chrzempiec said at 00:09 on February 18th, 2015:

    Hello i tried your sketch and it works thank you. But the problem I’m having is that the delay receiving it on the serial monitor is very slow it’s like instead of 1 second i get like a 5 second delay. i try to take out the delay that seems to go faster but then i get instead of a hello world once i get it like 3 times at once. can someone please help me out? thank you.

  4. 4
    nettigo said at 12:49 on February 19th, 2015:

    @Jospeh
    Hard to say what is wrong.

    If there are radio interferences nrf makes few tries to send – maybe this is the case? Something is interfering – can You make test in another environment?

    Second guess is that after some work we find that Mirf library (https://github.com/stanleyseow/arduino-nrf24l01 ) is much better in terms of stability. We will write some examples in future, but right now You can take a look at codehttps://github.com/nettigo/TinnySensorModule This sketch is for ATtiny84, but inside is folder with code for UNO to receive data.

  5. 5
    Luke said at 03:42 on March 12th, 2015:

    Hi, I tried your code and it works for one or two lines but then it starts outputting gobbeltygook forever.

    I’m not sure what’s going on here. At first I had the pins you point out as 7 and 8 as 9 and 10 so I changed them to 7 and 8 but it does the same thing.

  6. 6
    nettigo said at 15:22 on April 2nd, 2015:

    @Luke
    So it works, first two times and later goes bananas? Frankly I don’t have idea… You use exactly code as in examples on our blog?
  7. 7
    Topcorner said at 18:39 on April 14th, 2015:

    new to all this – getting ARduino IDE 1.6.3 compile error shown below. I have a feeling something is pointing to the wrong area so it is not picking up all the libraries but cannot figure it out. I’ve tried changing the in the include statements to “xxx” but no change. Would greatly appreciate any help you can offer.

    Arduino: 1.6.3 (Windows 7), Board: “Pro Trinket 3V/12MHz (FTDI)”

    Using library SPI in folder: C:\Users\Top\AppData\Roaming\Arduino15\packages\arduino\hardware\avr\1.6.2\libraries\SPI
    Using library RF24-master in folder: C:\Users\Top\Documents\Arduino\libraries\RF24-master (legacy)

    C:\Users\Top\AppData\Roaming\Arduino15\packages\arduino\tools\avr-gcc\4.8.1-arduino2/bin/avr-g++ -c -g -Os -w -fno-exceptions -ffunction-sections -fdata-sections -fno-threadsafe-statics -MMD -mmcu=atmega328p -DF_CPU=12000000L -DARDUINO=10603 -DARDUINO_AVR_PROTRINKET5FTDI -DARDUINO_ARCH_AVR -IC:\Users\Top\AppData\Roaming\Arduino15\packages\arduino\hardware\avr\1.6.2\cores\arduino -IC:\Users\Top\AppData\Roaming\Arduino15\packages\arduino\hardware\avr\1.6.2\variants\eightanaloginputs -IC:\Users\Top\AppData\Roaming\Arduino15\packages\arduino\hardware\avr\1.6.2\libraries\SPI -IC:\Users\Top\Documents\Arduino\libraries\RF24-master C:\Users\Top\AppData\Local\Temp\build8004962604088768678.tmp\RF24_Hello_World_tx.cpp -o C:\Users\Top\AppData\Local\Temp\build8004962604088768678.tmp\RF24_Hello_World_tx.cpp.o
    RF24_Hello_World_tx.ino: In function ‘void setup()':
    RF24_Hello_World_tx.ino:13:31: error: invalid conversion from ‘const byte* {aka const unsigned char*}’ to ‘uint64_t {aka long long unsigned int}’ [-fpermissive]
    In file included from RF24_Hello_World_tx.ino:3:0:
    C:\Users\Top\Documents\Arduino\libraries\RF24-master/RF24.h:324:8: error: initializing argument 1 of ‘void RF24::openWritingPipe(uint64_t)’ [-fpermissive]
    void openWritingPipe(uint64_t address);
  8. 8
    nettigo said at 19:05 on April 14th, 2015:

    Hi!
    Thank You for trying our examples. RF24 was our first choice when we started projects with nRF modules, however now we prefer https://github.com/aaronds/arduino-nrf24l01 Mirf library. Less features but more stable.

    These errors are related to changes in newer IDE and compiler. I think if You fallback to 1.5.x it will work.

    We plan to rewrite examples to Mirf library using newer IDE, but I can not give any estimate when it can happen.

  9. 9
    Topco said at 19:37 on April 14th, 2015:

    Thank you for the info. I’ll keep plugging away at it.

  10. 10
    Ed said at 00:05 on April 15th, 2015:

    Since NRF24l01 sends max of 32 bytes at a time, how do you go about sending a set of information that has 150 bytes?

    What if instead of test you are sending numbers?

    I am trying to send a bunch of data from some sensors.

    Thanks

  11. 11
    nettigo said at 22:19 on April 23rd, 2015:

    @Ed
    There is no support for that AFAIK, Your software has to split message into smaller chunks and put them back on the other side…
  12. 12
    Maciek said at 18:58 on May 2nd, 2015:

    Nie działa. Ani na Arduino IDE 1.0.5-r2, ani na 17.2
    radio.openReadingPipe(0, rxAddr);

    sketch_may02c.ino: In function ‘void setup()':
    sketch_may02c:15: error: invalid conversion from ‘const byte*’ to ‘uint64_t’
    sketch_may02c:15: error: initializing argument 2 of ‘void RF24::openReadingPipe(uint8_t, uint64_t)’
  13. 13
    spikes556 said at 01:41 on May 14th, 2015:

    I was having trouble with the Arduino Micro and the NRF24l01. I found the solution on this web page

    http://minspan.blogspot.com/2014/06/nrf24l01-rf24-radio-on-arduino-micro.html

    Basically, the ICSP are not hooked up or hooked up wrong. You will have to use pin 11 for MISO, pin 9 for SCK, pin 10 for MOSI. The mentioned website explains it further.

  14. 14
    Divyesh said at 02:22 on May 16th, 2015:

    Hello,

    Very nice and simple Hello world example. It is pretty useful as a beginner.

    No I have a question for you. Have tried to set a network of more than one nrf24l01?

    i am working on the project where I am making a network4 nrf24l01 transceivers, such that one can broadcast the text message from one transceiver at the base station to all the other transceivers connected to it. After receiving the message, the transceiver should reply back to the base station in same manner.

    I need your some guidance in the coding. What should be the code at base station and what could be the code at other node?

    Please help..It’s urgent!!!

    Thank you

  15. 15
    afzal rehmnai said at 07:56 on May 24th, 2015:

    can u post the schemetics for the both the transmitter and the reciever i am confused ….

    should i use 2 arduino and 2 nrfl01 for communications ????? plz help some

  16. 16
    TeDe123 said at 09:38 on June 11th, 2015:

    Hi,

    Thanks a lot for this tutorial. It’s great and probably the best in whole web.

    I’ve run this exaple on my Arduino Due boards. I’ve just needed to write #define RF24_DUE in the code to make it works. Everything is correct and i am sending and receiving messegas on my boards.

    Now I have to use the nrf24lo1 transmission with my usb host shield which uses SPI too. Does somebody knows how to initialize SPI in code for two devices – usb host shield and nrf24l01 in this case, (maybe some hardware changes are needed?)

    I found the information in datasheet that shield uses pin 10 as a CS PIN, so i’ve changed it for nrf to pin 4. When i did that and stopped using port 10 for nrf24l01 my program doesn’t work anymore. I cannot even write anything on terminal using Serial.println() function.

    If i use pin 10 for nrf CS again Serial port works, but nrf transmission doesn’t work.

    Maybe somebody could help me.

  17. 17
    AhmarSultan said at 12:48 on June 12th, 2015:

    I have an UNO and on the other hand a MEGA. The UNO works fine as a transmitter when I connect it with an external power supply where the MEGA is connected as the receiver to the computer. But when i do the vice versa of it (MEGA as transmitter and UNO as receiver) and i connect MEGA to the external power supply, no packets are received and no change is captured. Can you suggest me a solution to my problem?

    I will be grateful.
    Thanks.
  18. 18
    Brian said at 23:49 on July 12th, 2015:

    These instructions worked great!

    I have the ADDICORE nRF24L01+ kit and had this running within an hour. The kit comes with Male-Female connectors so it was easier to connect from the RF board to the Arduino on the digital input pins (11, 12, 13) instead of the ICSP pins.

    How do I send numeric data? I need to send a byte, not text.

    Thanks in advance to whoever can post some simple Arduino code to answer this question.

  19. 19
    Brian said at 13:40 on July 13th, 2015:

    I figured out one way to send a number instead of a string:

    //define
    byte msg[1];

    void loop()
    msg[0] = any_byte_number;
    radio.write(msg, 1);
  20. 20
    Dario said at 14:53 on July 13th, 2015:

    Hi!
    Your explanation is complete and straightforward, much more than any other confusing website on the web

    Thanks a lot!

  21. 21
    Hiloliddin said at 19:28 on August 10th, 2015:

    Hello

    I have error in compiling here:

    radio.openWritingPipe(rxAddr);

    error message is here:

    Arduino: 1.6.6 Hourly Build 2015/08/07 05:34 (Windows 8.1), Board: “Arduino Uno”

    transmittr.ino: In function ‘void setup()':
    transmittr:15: error: invalid conversion from ‘const byte* {aka const unsigned char*}’ to ‘uint64_t {aka long long unsigned int}’ [-fpermissive]
    In file included from transmittr.ino:5:0:
    C:\Users\a\Documents\Arduino\libraries\RF24/RF24.h:324:8: error: initializing argument 1 of ‘void RF24::openWritingPipe(uint64_t)’ [-fpermissive]
    void openWritingPipe(uint64_t address);
    ^
    invalid conversion from ‘const byte* {aka const unsigned char*}’ to ‘uint64_t {aka long long unsigned int}’ [-fpermissive]

    This report would have more information with
    “Show verbose output during compilation”
    enabled in File > Preferences.

    can help please

    thanks

  • ShahBaz

راه اندازی ماژول وایرلس nRF24L01 و جوی استیک با اردوینو

ShahBaz | دوشنبه, ۲۶ مرداد ۱۳۹۴، ۰۳:۴۰ ب.ظ

دانلود آموزش فارسی  راه اندازی ماژول وایرلس NRF24L01

+کدهای گیرنده و فرستنده+کتابخانه+پاورپوینت توضیحات و شماتیک 

در قالب یک پروژه کاملا عملی


NRF24L01 Radio 2.4GHz Transmitter Receiver On Arduino

Charles W. | May 4, 2014

NRF24L01 is a 2.4GHz wireless radio frequency module that can be used to transmit and receive data. This is a great wireless module suitable for short range 100m remote control at 250kbps data rate. Let us look at how to setup NRF24L01 radio frequency transmitter and receiver on the Arduino. For simplicity, let us pick a simple joystick module as the data source where we transmit the X and Y values of the joystick to the receiver via wireless radio frequency at 2.4GHz frequency band. We will have to setup the transmitter and receiver. There are 8 pins on the NRF24L01 RF module, with 2 power pins for the VCC and GND, the CE pin, SCN pin, SCK, MOSI, MISO and IRQ pin. Refer below for the hardware and software setups.

Setup NRF24L01 2.4GHz Radio Frequency Module On Arduino As Transmitter

To setup the NRF24L01 as transmitter on the Arduino, connect the VCC and GND of the module to 3.3v and GND on the Arduino respectively. The CE is connected to pin 9, the SCN is connected to pin 10, the SCK is connected to pin 13, the MOSI is connected to pin 11, the MISO is connected to pin 12 and the IRQ is left unconnected. The joystick module is powered by 5V and GND on the Arduino, while Horizontal (x axis) is set to A0 and Vertical (y axis) is set to A1 of Arduino, we leave the Select (Z axis for “1″ and “0″) unconnected.

NRF24L01 Transmitter

Our intention is to have the A0 and A1 analog pins to collect the X and Y values of the joystick, and send the data wirelessly via NRF24L01 module. Download the RF24 Library for NRF24L01, and write below sketch to be uploaded to the Arduino.

دانلود آموزش فارسی  راه اندازی ماژول وایرلس NRF24L01

+کدهای گیرنده و فرستنده+کتابخانه+پاورپوینت توضیحات و شماتیک 

در قالب یک پروژه کاملا عملی


NRF24L01 Transmitter Sketch

#include <SPI.h>
#include <nRF24L01.h>
#include <RF24.h>
#define CE_PIN 9
#define CSN_PIN 10
#define JOYSTICK_X A0
#define JOYSTICK_Y A1

const uint64_t pipe = 0xE8E8F0F0E1LL;

RF24 radio(CE_PIN, CSN_PIN);
int joystick[2];

void setup()
{
Serial.begin(9600);
radio.begin();
radio.openWritingPipe(pipe);
}

void loop()
{
joystick[0] = analogRead(JOYSTICK_X);
joystick[1] = analogRead(JOYSTICK_Y);
radio.write( joystick, sizeof(joystick) );
}

Setup NRF24L01 2.4GHz Radio Frequency Module On Arduino As Receiver

To setup the NRF24L01 RF module as a receiver to sync the data at 2.4GHz band, setup a separate Arduino and NRF24L01 module as in the setup in below picture. Power up the NRF24L01 module with VCC  and GND connected to 3.3V and GND on the Arduino. The CE is connected to pin 9 on the Arduino, the SCN is connected to pin 10, the SCK is connected to pin 13, the MOSI is connected to pin 11, the MISO is connected to pin 12 and IRQ is left unconnected.

NRF24L01 Receiver

Upload the sketch below to the Arduino to open up the reading pipe, listen and read the joystick X and Y data wirelessly via radio frequency. The data is then serial printed and can be checked via the Serial Monitor on the Arduino software.

NRF24L01 Receiver Sketch

#include <SPI.h>
#include <nRF24L01.h>
#include <RF24.h>
#define CE_PIN 9
#define CSN_PIN 10

const uint64_t pipe = 0xE8E8F0F0E1LL;

RF24 radio(CE_PIN, CSN_PIN);

int joystick[2];

void setup()
{
Serial.begin(9600);
delay(1000);
Serial.println(“Nrf24L01 Receiver Starting”);
radio.begin();
radio.openReadingPipe(1,pipe);
radio.startListening();;
}

void loop()
{
if ( radio.available() )
{
bool done = false;
while (!done)
{
done = radio.read( joystick, sizeof(joystick) );
Serial.print(“X = “);
Serial.print(joystick[0]);
Serial.print(” Y = “);
Serial.println(joystick[1]);
}
}
else
{
Serial.println(“No radio available”);
}

}

Check NRF24L01 Result Via Serial Monitor

Connect the receiver to the computer, open up the Arduino software and Serial Monitor, the X and Y data of the joystick shall be printed out as in below picture.

NRF24L01 Arduino Joystick Test Result


دانلود آموزش فارسی  راه اندازی ماژول وایرلس NRF24L01

+کدهای گیرنده و فرستنده+کتابخانه+پاورپوینت توضیحات و شماتیک 

در قالب یک پروژه کاملا عملی

  • ShahBaz

راه اندازی ماژول وایرلس nRF24L01 با اردوینو

ShahBaz | يكشنبه, ۲۵ مرداد ۱۳۹۴، ۱۱:۳۳ ب.ظ


nRF24L01 Wireless Module with Arduino

Now we have a demo show how to use the Arduino controlling the nRF24L01 module , and you need two Arduino boards and two modules, one to transmit and the other receive. The connection of two part is the same but the different software.

The nRF24L01 module is worked at 3V voltage level , so the Arduino 5V pins may destroy it , so we need to add some resister to protect the module – using the 10K and the 15K resister to reduce the voltage is a usual method.

Connect the module pins to Arduino as below:
CS – D8 , CSN – D9 , SCK – D10 , MOSI – D11 , MISO – D12 , IRQ – D13
 

Download the code below into the TX Arduino  (transmit) — This code will drive the nRF24L01 module to send out data form 0×00 to 0xFF .
void setup()
{
  SPI_DIR = ( CE + SCK + CSN + MOSI);
  SPI_DIR &amp;=~( IRQ + MISO);
  Serial.begin(9600);
  init_io();
  TX_Mode();
}
void loop()
{
  unsigned char status=0;
  unsigned char key=0;
  for(;;)
  {
    tx_buf[1]=key;
    key++;
    status=SPI_Read(STATUS);
    if(status&amp;TX_DS)
    {
      SPI_RW_Reg(FLUSH_TX,0);
      Serial.println(tx_buf[1],HEX);
      SPI_Write_Buf(WR_TX_PLOAD,tx_buf,TX_PLOAD_WIDTH);
    }
    SPI_RW_Reg(WRITE_REG+STATUS,status);
    delay(1000);
  }
 
}

Download the code below into the RX Arduino (receive) – This code will drive the nFR24L01 module to receive the data that transmit form the TX module and print it to serial port.

void setup()
{
  SPI_DIR = ( CE + SCK + CSN + MOSI);
  SPI_DIR&amp;=~ ( IRQ + MISO);
  Serial.begin(9600);
  init_io();
  RX_Mode();
}
void loop()
{
  unsigned char status=0;
  unsigned char key=0;
  for(;;)
  {
    tx_buf[1]=key;
    key++;
    status=SPI_Read(STATUS);
    if(status&amp;TX_DS)
    {
      SPI_RW_Reg(FLUSH_TX,0);
      Serial.println(tx_buf[1],HEX);
      SPI_Write_Buf(WR_TX_PLOAD,tx_buf,TX_PLOAD_WIDTH);
    }
    SPI_RW_Reg(WRITE_REG+STATUS,status);// clear RX_DR or TX_DS or MAX_RT interrupt flag
    delay(1000);
  }
}

Now power on both Arduino , and connect the RX one to PC via USB. Open the IDE serial port monitor , change the baud rate to 9600 bps , and you can see the data that received.

If you want to change Arduino pin connecting to module , just modify the define on the NRF24L01.h .

All the project here(include API.h and NRF24L01.h)

  nRF24L01 Demo code for Arduino (unknown, 4,705 hits)

You can fine the cables , resisters and the nRF24L01 module that used in the demo on our webshop.


http://blog.iteadstudio.com/nrf24l01-wireless-module-with-arduino/


دانلود آموزش فارسی  راه اندازی ماژول وایرلس NRF24L01

+کدهای گیرنده و فرستنده+کتابخانه+پاورپوینت توضیحات و شماتیک 

در قالب یک پروژه کاملا عملی


NRF24L01 Radio 2.4GHz Transmitter Receiver On Arduino

Charles W. | May 4, 2014

NRF24L01 is a 2.4GHz wireless radio frequency module that can be used to transmit and receive data. This is a great wireless module suitable for short range 100m remote control at 250kbps data rate. Let us look at how to setup NRF24L01 radio frequency transmitter and receiver on the Arduino. For simplicity, let us pick a simple joystick module as the data source where we transmit the X and Y values of the joystick to the receiver via wireless radio frequency at 2.4GHz frequency band. We will have to setup the transmitter and receiver. There are 8 pins on the NRF24L01 RF module, with 2 power pins for the VCC and GND, the CE pin, SCN pin, SCK, MOSI, MISO and IRQ pin. Refer below for the hardware and software setups.

Setup NRF24L01 2.4GHz Radio Frequency Module On Arduino As Transmitter

To setup the NRF24L01 as transmitter on the Arduino, connect the VCC and GND of the module to 3.3v and GND on the Arduino respectively. The CE is connected to pin 9, the SCN is connected to pin 10, the SCK is connected to pin 13, the MOSI is connected to pin 11, the MISO is connected to pin 12 and the IRQ is left unconnected. The joystick module is powered by 5V and GND on the Arduino, while Horizontal (x axis) is set to A0 and Vertical (y axis) is set to A1 of Arduino, we leave the Select (Z axis for “1″ and “0″) unconnected.

NRF24L01 Transmitter

Our intention is to have the A0 and A1 analog pins to collect the X and Y values of the joystick, and send the data wirelessly via NRF24L01 module. Download the RF24 Library for NRF24L01, and write below sketch to be uploaded to the Arduino.

NRF24L01 Transmitter Sketch

#include <SPI.h>
#include <nRF24L01.h>
#include <RF24.h>
#define CE_PIN 9
#define CSN_PIN 10
#define JOYSTICK_X A0
#define JOYSTICK_Y A1

const uint64_t pipe = 0xE8E8F0F0E1LL;

RF24 radio(CE_PIN, CSN_PIN);
int joystick[2];

void setup()
{
Serial.begin(9600);
radio.begin();
radio.openWritingPipe(pipe);
}

void loop()
{
joystick[0] = analogRead(JOYSTICK_X);
joystick[1] = analogRead(JOYSTICK_Y);
radio.write( joystick, sizeof(joystick) );
}

Setup NRF24L01 2.4GHz Radio Frequency Module On Arduino As Receiver

To setup the NRF24L01 RF module as a receiver to sync the data at 2.4GHz band, setup a separate Arduino and NRF24L01 module as in the setup in below picture. Power up the NRF24L01 module with VCC  and GND connected to 3.3V and GND on the Arduino. The CE is connected to pin 9 on the Arduino, the SCN is connected to pin 10, the SCK is connected to pin 13, the MOSI is connected to pin 11, the MISO is connected to pin 12 and IRQ is left unconnected.

NRF24L01 Receiver

Upload the sketch below to the Arduino to open up the reading pipe, listen and read the joystick X and Y data wirelessly via radio frequency. The data is then serial printed and can be checked via the Serial Monitor on the Arduino software.

NRF24L01 Receiver Sketch

#include <SPI.h>
#include <nRF24L01.h>
#include <RF24.h>
#define CE_PIN 9
#define CSN_PIN 10

const uint64_t pipe = 0xE8E8F0F0E1LL;

RF24 radio(CE_PIN, CSN_PIN);

int joystick[2];

void setup()
{
Serial.begin(9600);
delay(1000);
Serial.println(“Nrf24L01 Receiver Starting”);
radio.begin();
radio.openReadingPipe(1,pipe);
radio.startListening();;
}

void loop()
{
if ( radio.available() )
{
bool done = false;
while (!done)
{
done = radio.read( joystick, sizeof(joystick) );
Serial.print(“X = “);
Serial.print(joystick[0]);
Serial.print(” Y = “);
Serial.println(joystick[1]);
}
}
else
{
Serial.println(“No radio available”);
}

}

Check NRF24L01 Result Via Serial Monitor

Connect the receiver to the computer, open up the Arduino software and Serial Monitor, the X and Y data of the joystick shall be printed out as in below picture.

NRF24L01 Arduino Joystick Test Result

http://www.bashmodulo.com/arduino/nrf24l01-radio-frequency-transmitter-receiver-on-arduino/


دانلود آموزش فارسی  راه اندازی ماژول وایرلس NRF24L01

+کدهای گیرنده و فرستنده+کتابخانه+پاورپوینت توضیحات و شماتیک 

در قالب یک پروژه کاملا عملی

  • ShahBaz

راه اندازی ماژول Nrf2401 با اردوینو

ShahBaz | شنبه, ۲۴ مرداد ۱۳۹۴، ۱۱:۱۴ ب.ظ

Simple nrf24L01 with Arduino Sketch and Setup

دانلود آموزش فارسی  راه اندازی ماژول وایرلس NRF24L01

+کدهای گیرنده و فرستنده+کتابخانه+پاورپوینت توضیحات و شماتیک 

در قالب یک پروژه کاملا عملی

nrf24L01

I have been working with the 2.4Ghz nrf24L01 modules on a few projects. These modules are very inexpensive (about US $1.25 ea. when bought in quantities of 2 or more on eBay), and they seem to work well for short range, small payload data transmittal. This walk-through will show you how to wire them up, and then will demonstrate a pair of very basic sketches (one for the sender, and one for the receiver) used to verify that data is being sent wirelessly.

You will need (hardware):
(2) nrf24L01 2.4ghz wireless transcievers
(2) Arduino Uno (or compatible)
(2) LEDs: Red and Green (or whatever you have)
Recommended: male-female jumpers for connecting nrf24L01 modules to Arduino

You will need (software):
Arduino IDE
RF24 libraries by maniacbug (https://github.com/maniacbug/RF24)

The image below shows the view of the nrf24L01 from the top.  Note: the pins are on the bottom-side.  The image shows the top-side.

nrf24l01_draw

This drawing shows the basic connections from nrf24L01 to Arduino.  For this sketch, the only difference between the sender and the receiver will be that two LEDs will need to be added on pins 3 and 5 (or whichever you choose, really).
nrfFritzingBasic

closeup of nrf24l01 to arduino connections
The send and receive Arduino setups.  Pay no attention to the LEDs without resistors.
The send and receive Arduino setups. Pay no attention to the LEDs without resistors.

Once you have the sender and receiver wired up, you will need to upload sketches to each.  All the sender sketch does is send values 0 to 255 to the receiver, repeatedly.

On the receiver side, the sketch just reads the sent data and compares it to the last value received.  If the value received is equal to the last value plus one, the green LED will light.  If it is not, the red LED will light.  This works pretty well to visually display how reliable the signal is.  If you see lots of red, you know you are dropping packets.  Note, though, that this sketch will blink the red LED once each cycle to indicate that a complete 0-255 cycle has taken place.

Again, the idea behind these two simple sketches is to get down to the most basic possible setup for use with nrf24L01.  I hope this helps someone trying out the nrf24L01 transceivers for the first time.  The video embedded below shows the behavior of the receiver when it experiences lost wireless packets.

Sketch for the sender:Sketch for the receiver:

Sketch for the sender:

  #include <nRF24L01.h>
  #include <RF24.h>
  #include <RF24_config.h>
  #include <SPI.h>
  int msg[1];
  RF24 radio(9,10);
  const uint64_t pipe = 0xE8E8F0F0E1LL;
  /*
  this is the most basic sketch I can think of to transmit data from an nrf24l01.
  It loops over the numbers 0-255 continuously and sends each number to the receiving
  unit. I have used this pattern as a test to check for drops in the signal by
  checking the receiving end for gaps between numbers. It's not sophisticated,
  but it seems to work.
  */
   
  void setup(void){
  Serial.begin(9600);
  radio.begin();
  radio.openWritingPipe(pipe);}
   
  void loop(void){
   
  for (int x=0;x<255;x++){
  msg[0] = x;
  radio.write(msg, 1);
  }
  }
view rawnrf24l01_basicSend hosted with ❤ by GitHub
Sketch for the receiver:

  #include <nRF24L01.h>
  #include <RF24.h>
  #include <RF24_config.h>
  #include <SPI.h>
  /*
  This is the corresponding sketch to the 'basicSend' sketch.
  the nrf24l01 will listen for numbers 0-255, and light the red LED
  whenever a number in the sequence is missed. Otherwise,
  it lights the green LED
  */
  int msg[1];
  RF24 radio(9,10);
  const uint64_t pipe = 0xE8E8F0F0E1LL;
  int red = 3;
  int green = 5;
  int redNeg = 4;
  int greenNeg = 6;
  int lastmsg = 1;
   
  void setup(void){
  Serial.begin(9600);
  radio.begin();
  radio.openReadingPipe(1,pipe);
  radio.startListening();
  pinMode(red, OUTPUT);
  pinMode(green, OUTPUT);
  pinMode(redNeg, OUTPUT);
  pinMode(greenNeg, OUTPUT);
  digitalWrite(greenNeg, LOW);
  digitalWrite(redNeg, LOW);
  }
   
  void loop(void){
  if (radio.available()){
  bool done = false;
   
  while (!done){
  done = radio.read(msg, 2);
  if (msg[0] != lastmsg +1){
  digitalWrite(red, HIGH);
  digitalWrite(green,LOW);
  }
  else {
  digitalWrite(red,LOW);
  digitalWrite(green,HIGH);
  }
  lastmsg = msg[0];
  Serial.println(msg[0]);
  }
  }
  else {
  digitalWrite(red, HIGH);
  digitalWrite(green,LOW);
  }
  }


 دانلود آموزش فارسی  راه اندازی ماژول وایرلس NRF24L01

+کدهای گیرنده و فرستنده+کتابخانه+پاورپوینت توضیحات و شماتیک 

در قالب یک پروژه کاملا عملی


  • ShahBaz

ماژول +NRF24L01 - برد SMD

ShahBaz | جمعه, ۲۳ مرداد ۱۳۹۴، ۱۲:۲۷ ق.ظ
TANHA71 در پنجشنبه 28 خرداد 1394 - 14:35:20
3 نظر
با سلام ، ماژول جمع جور و با کیفیتی هست و خدایش ارزش خرید داره. خب من پایه هاش را می نویسم که دوستان باهاش مشکل پیدا نکنن!
روی برد از پایه 1 " به رنگ سفید نوشته شده" 
پایه 1= VCCکه باید به 3.3 ولت وصل بشه و نه بیشتر. پایه 2= GND و پایه 3=CE و پایه 4=CSN=CS پایه 5=CLK=SCKو پایه 6 =DAT=MOSI و پایه 7 = MISOو چایه 8= IRQ


Pin connections:

DR1 -> 2 (digital pin 2)
CE -> 3
CS -> 4
CLK -> 5
DAT -> 6

علیرضا در سه شنبه 04 آذر 1393 - 22:48:04
3 نظر
با سلام
برد این ماژول چقدر است؟
غلامحسین بغدادپور در دوشنبه 05 آبان 1393 - 09:08:05
3 نظر
من راه اندازیش کردم؛بی نظیره ...

پاسخ: سلام خوشحال می شویم اطلاعات خودتون رو در انجمن ب دوستان به اشتراک بذارید

 در این آموزش سعی میکنم تا هر چیزی که در مورد این فرستنده وگیرنده میدونم در اختیارتون بزارم تا استاد های محترم به تونند به من کمک کنند 

این فرستنده ها یک نوع فرستنده قوی هستند که دیتا لاس کمتری دارند یعنی اطلاعات ازدست رفته کمتری دارند به طور خلاصه اگه به همدیگه کانکت بشن دیگه هیچ اطلاعاتی ازبین نمیره . اما شاید برای شما هم این سوال بیش اومده که برد این نوع فرستنده ها یا گیرنده ها چقدر هست در جواب باید یگم که اگر خوب تقویت بشن (با استفاده از مدارات تقویت کننده )حداکثر بردی که میتونن داشته باشن اونم تویک فضای باز که باد نباشه ۱۸۰۰ متر در نوع برد ایرانی هست.

بردهای دیگری هم هستند که توی فروشگاه های اینترنتی کمترین برد در فضای باز رو ۱۰۰ متر تعیین کردن که با تستهای من بردش به این حدود میرسه البته تو یه فضای باز که باد هم نوزه! تست دیگه من این بود که یکی از این بردها رو تو گوشه یه اتاق درست ته خونه گذاشتم که ۳تا دیوار داشت تا حدود ۱۵ متر رو جواب داد این برد به شکل زیر هست

ماژول دیگری هم هست که بردش ۱۱۰۰ متر هست شکلش هم به صورت زیر 

اولی حدود۷تومن دومی هم حدود ۳۵ تومن هستش. اینها مباحث در مورد انتخاب ماژول مناسب برای پروژم بودچ
نحوه راه اندازی راه اندازی ماژول NRF24L01 با بسکام:

خوب باید در اول توضیح بدم که ما یک ماژول داریم که هم میتونه به صورت فرستنده وهم به صورت گیرنده کار کنه برای شروع باید ابتدا نام پایه ها رو بدونید تا با هاش کار کنید شکل زیر نام پایه ها وترتیبشون رو نششون میده

نحوه تنظیم به عنوان گیرنده:

برای اینکار باید پین شماره 2 رو ۱ کنید یعنی ۳٫۳ولت یا ۵ ولت بشه(این نکته را یاد آور شوم که این ماژول تحمل ۵ ولت را رویه پایه های دیتا دارد ولی باید حتما حتما ولتاژ تغذیه ۳ولت باشه نه بیشتر)

PIN CE=1
BIT : PWR_UP=1 IN CONFIG REGISTER
BIT :PRIM_RX=1
نحوه تنظیم به عنوان فرستنده:
طبق دیتا شیت این ماژول نباید این ماژول بیشتر از ۴میلی ثانیه در مد فرستنده باشه!!!!من که نفهمیدم واسه چی حالا بیخیال این تنضیمات واسه مد فرستنده هست

PIN CE=1
BIT : PWR_UP=0 IN CONFIG REGISTER
BIT :PRIM_RX=1
شوخی کردم که گفتم نمیفهمم راستش اگه تو حافظه انتقال اطلاعات اگه چیزی نباشه به استند بای میره که دوتا استند بای داره حالا نمیخوام قضیه رو برای شما پیچیدش کنم.

میریم واسه تنظیمات دیتا ریت یا نرخ داده ارسالی این ماژول:
برای تنظیم نرخ داده باید تو۲مگابیت بر ثانیه بایدرجیستر زیر به اینگونه تنظیم بشه

06==H0F=00001111 2 MB/S AND LNA GAIN IS ON
06==H07=00000111 1 MB/S AND LNA GAIN IS ON
در این رجیستر میتوان قدرت ارسال داده را نیز تغیر داد یعنی افزایش یا کاهش داد من تا حالا با صفر دسی بل کار کردم ولی فکر میکنم با افزایش میزان دسی بل بتوان برد این ماژول را افزایش داد اگر میخواهی به جای کد هگز بالا از کد هگز پایین استفاده کنید که میزان دسی بل برابر ۱۸ است:


06==00001001=H09هر یک از این ماژول ها میتوانند با ۶ دستگاه دیگر ارتباط برقرار کنندبه طور همزمان که من به این توضیحات اکتفا میکنم هرچند کم هست ولی من سعی کردم مشکل اساسی افراد در قدرت ارسال و برد و نحوه تنضیم به عنوان گیرنده وفرستنده رو تو این آموزش کوچک براتون بگم من نمونه برنامه راه اندازی این ماژول با بسکام رو از اینترنت پیدا کردم ولی خیلی مبهم هست پس به توضیح این برنامه شروع میکنم:

کدهای برنامه به صورت زیر هست:

دقت کنید این برنامه هم برای گیرنده و هم برای فرستنده هست که فقط با ست یا ریست کرده یک پایه از میکرو . میکر. به فرستنده یا گیرنده تبدیل میشود بدون اینکه برنامه ریزی مجدد انجام بدید در ضمن در این برنامه از اینتراپت میکرو استفاده نشده ودنبال اینتراپت نگردید:
قسمت ۱ کد های راه اندازی ماژول NRF24L01 با بسکام:
قسمت 1


$regfile = "M8def.dat"
$crystal = 8000000
$hwstack = 40
$swstack = 20
$framesize = 40
 
'=== Declare sub routines
Declare Sub R_register(byval Command As Byte , Byval C_bytes As Byte)
Declare Sub W_register(byval C_bytes As Byte)
 
'=== Constante ===
'Define nRF24L01 interrupt flag's
Const Idle_int = &H00                                       'Idle, no interrupt pending
Const Max_rt = &H10                                         'Max #of Tx Retrans Interrupt
Const Tx_ds = &H20                                          'Tx Data Sent Interrupt
Const Rx_dr = &H40                                          'Rx Data Received
'SPI(nRF24L01) commands
Const Read_reg = &H00                                       'Define Read Command To Register
Const Write_reg = &H20                                      'Define Write Command To Register
Const Rd_rx_pload = &H61                                    'Define Rx Payload Register Address
Const Wr_tx_pload = &HA0                                    'Define Tx Payload Register Address
Const Flush_tx = &HE1                                       'Define Flush Tx Register Command
Const Flush_rx = &HE2                                       'Define Flush Rx Register Command
Const Reuse_tx_pl = &HE3                                    'Define Reuse Tx Payload Register Command
Const Nop_comm = &HFF                                       'Define No Operation , Might Be Used To Read Status Register
'SPI(nRF24L01) registers(addresses)
Const Config_nrf = &H00                                     'Config' register address
Const En_aa = &H01                                          'Enable Auto Acknowledgment' register address
Const En_rxaddr = &H02                                      'Enabled RX addresses' register address
Const Setup_aw = &H03                                       'Setup address width' register address
Const Setup_retr = &H04                                     'Setup Auto. Retrans' register address
Const Rf_ch = &H05                                          'RF channel' register address
Const Rf_setup = &H06                                       'RF setup' register address
Const Status = &H07                                         'Status' register address
Const Observe_tx = &H08                                     'Observe TX' register address
Const Cd = &H09                                             'Carrier Detect' register address
Const Rx_addr_p0 = &H0A                                     'RX address pipe0' register address
Const Rx_addr_p1 = &H0B                                     'RX address pipe1' register address
Const Rx_addr_p2 = &H0C                                     'RX address pipe2' register address
Const Rx_addr_p3 = &H0D                                     'RX address pipe3' register address
Const Rx_addr_p4 = &H0E                                     'RX address pipe4' register address
Const Rx_addr_p5 = &H0F                                     'RX address pipe5' register address
Const Tx_addr = &H10                                        'TX address' register address
Const Rx_pw_p0 = &H11                                       'RX payload width, pipe0' register address
Const Rx_pw_p1 = &H12                                       'RX payload width, pipe1' register address
Const Rx_pw_p2 = &H13                                       'RX payload width, pipe2' register address
Const Rx_pw_p3 = &H14                                       'RX payload width, pipe3' register address
Const Rx_pw_p4 = &H15                                       'RX payload width, pipe4' register address
Const Rx_pw_p5 = &H16                                       'RX payload width, pipe5' register address
Const Fifo_status = &H17                                    'FIFO Status Register' register address
'Various
Const True = 1
Const False = 0
قسمت ۲:


'=== Config hardware ===
Config Spi = Hard , Interrupt = Off , Data Order = Msb , Master = Yes , Polarity = Low , Phase = 0 , Clockrate = 4 , Noss = 1
'Software SPI is NOT working with the nRF24L01, use hardware SPI only, but the SS pin must be controlled by our self
Config Pinb.1 = Output                                      'CE pin is output
Config Pinb.2 = Output                                      'SS pin is output
Config Pinb.0 = Input                                       'IRQ pin is input
Config Pinc.3 = Input                                       'TX/RX Device _select
Config Portc.4 = Output
Ce Alias Portb.1
Ss Alias Portb.2
Irq Alias Pinb.0
Txrx_device Alias Pinc توسط این پایه میکرو گیرنده یا فرستنده میشود
Spiinit                                                     'init the spi pins
Set Ce
Waitms 10                                                   'Wait a moment until all hardware is stable
Reset Ce                                                    'Set CE pin low
Reset Ss                                                    'Set SS pin low (CSN pin)
Dim D_bytes(33) As Byte , B_bytes(33) As Byte               'Dim the bytes use for SPI, D_bytes = outgoing  B_bytes = Incoming
Dim Temp As Byte , W As Word
Dim Packet_count As Byte
 
 
If Txrx_device = True Then Goto Main_tx                     'Is this the RX or TX device?
قسمت سوم:

'===Main rx==========================================================================================================================
Main_rx:
Call R_register(status , 1)                                 'Read STATUS register
 
Reset Ce                                                    'Set CE low to access the registers
Gosub Setup_rx                                              'Setup the nRF24L01 for RX
Waitms 2                                                    'Add a delay before going in RX
Set Ce                                                      'Set nRF20L01 in RX mode
Do                                                          'Main loop for RX
If Irq = 0 Then                                             'Wait until IRQ occurs, pin becomes low on interrupt
    Reset Ce                                                'Receiver must be disabled before reading pload
    Do                                                      'Loop until all 3 fifo buffers are empty
      Call R_register(rd_rx_pload , 5)                      'Read 5 bytes RX pload register
      Select Case B_bytes(5)
      Case 2 : Set Portc.4
      Case Else : Reset Portc.4
      End Select
      'Print "Pload  : " ; Hex(b_bytes(1)) ; Hex(b_bytes(2)) ; Hex(b_bytes(3)) ; Hex(b_bytes(4)) ; Hex(b_bytes(5))       'Print the pload
      Call R_register(fifo_status , 1)                      'Read FIFO_STATUS
    Loop Until B_bytes(1).0 = True                          'Test or RX_EMPTY bit is true, RX FIFO empty
    D_bytes(1) = Write_reg + Status                         'Reset the RX_DR status bit
    D_bytes(2) = &B01000000                                 'Write 1 to RX_DR bit to reset IRQ
    Call W_register(2)
    Set Ce                                                  'Enable receiver again
   Waitms 2
End If
'Gosub Dump_registers                                        'Unremark me for debugging
Loop
Return
قسمت چهارم:

'===Main tx==========================================================================================================================
Main_tx:
'Print "TX_device"                                           'Send to terminal who i'm
D_bytes(1) = Flush_tx                                       'Flush the TX_fifo buffer
Call W_register(1)
D_bytes(1) = Write_reg + Status                             'Reset the IRQ bits
D_bytes(2) = &B00110000
Call W_register(2)
Do                                                          'Main loop for TX
Incr Packet_count                                           'Increase the send packet counter, for test only
If Packet_count > 254 Then Packet_count = 0
Gosub Setup_tx                                              'Setup the nrf240l01 for TX
D_bytes(1) = Wr_tx_pload                                    'Put 5 bytes in the TX pload buffer
D_bytes(2) = &HAA                                           'Byte 1
D_bytes(3) = &HBB                                           'Byte 2
D_bytes(4) = &HCC                                           'Byte 3
D_bytes(5) = &H11                                           'Byte 4
D_bytes(6) = 2                                              'Byte 5 will be increase every loop
Call W_register(6)                                          'Write 6 bytes to register
Waitms 2
Set Ce                                                      'Set CE for a short moment to transmit the fifo buffer
Waitms 1                                                    '
Reset Ce                                                    '
Waitms 100                                                  'Some delay to read the output on the terminal, line can be removed for max. speed
W = 0                                                       'Counter for time out
Do
   If Irq = 0 Then
       Call R_register(status , 1)
       Temp = B_bytes(1) And &B01110000                     'Mask the IRQ bits out the status byte
      Select Case Temp                                      'Which IRQ occurs
        Case Max_rt                                         'MAX_RT
            'Print "Maximum number of TX retries, Flussing the TX buffer now !"
            D_bytes(1) = Flush_tx                           'Flush the TX buffer
            Call W_register(1)
            D_bytes(1) = Write_reg + Status
            D_bytes(2) = &B00010000                         'Clear the MAX_RT IRQ bit
            Call W_register(2)
            Exit Do
        Case Tx_ds                                          'TX_DS
            'Print "Packet " ; Packet_count ; " send and ACK received."
            D_bytes(1) = Write_reg + Status
            D_bytes(2) = &B00100000                         'Clear the TX_DS IRQ bit
            Call W_register(2)
            Exit Do
        Case Else                                           'Other IRQ ??
            'Print "Other irq " ; Bin(temp)
            D_bytes(1) = Flush_tx                           'Flush the TX buffer
            Call W_register(1)
            D_bytes(1) = Write_reg + Status
            D_bytes(2) = &B00110000                         'Clear both MAX_RT, TX_DS bits
            Call W_register(2)
        End Select
   End If
    Waitms 1                                                'Time out waiting for IRQ 1ms * 100
    Incr W                                                  'Increment W
    If W > 100 Then                                         'Waited for 100ms
     ' Print "No irq response from RF20L01 within 100ms"
      Exit Do                                               'Exit the wait loop
    End If
Loop
Loop
Return
          
قسمت پنجم:

'=== Sub routines ===
Sub W_register(byval C_bytes As Byte)                       'Write register with SPI
Reset Ss                                                    'Manual control SS pin, set SS low before shifting out the bytes
    Spiout D_bytes(1) , C_bytes                             'Shiftout the data bytes trough SPI , C_bytes is the amount bytes to be written
Set Ss                                                      'Set SS high
End Sub
 
 
Sub R_register(byval Command As Byte , Byval C_bytes As Byte) As Byte       'C_bytes = Count_bytes, number off bytes to be read
Reset Ss                                                    'Manual controle SS pin, set low before shifting in/out the bytes
    Spiout Command , 1                                      'First shiftout the register to be read
    Spiin B_bytes(1) , C_bytes                              'Read back the bytes from SPI sended by nRF20L01
Set Ss                                                      'Set SS back to high level
End Sub
 
 
Setup_rx:                                                   'Setup for RX
D_bytes(1) = Write_reg + Rx_addr_p0                         'RX adress for pipe0
D_bytes(2) = &H34
D_bytes(3) = &H43
D_bytes(4) = &H10
D_bytes(5) = &H10
D_bytes(6) = &H01
Call W_register(6)                                          'Send 6 bytes to SPI
D_bytes(1) = Write_reg + En_aa                              'Enable auto ACK for pipe0
D_bytes(2) = &H01
Call W_register(2)
D_bytes(1) = Write_reg + En_rxaddr                          'Enable RX adress for pipe0
D_bytes(2) = &H01
Call W_register(2)
D_bytes(1) = Write_reg + Rf_ch                              'Set RF channel
D_bytes(2) = 40
Call W_register(2)
D_bytes(1) = Write_reg + Rx_pw_p0                           'Set RX pload width for pipe0
D_bytes(2) = 5
Call W_register(2)
D_bytes(1) = Write_reg + Rf_setup                           'Setup RF-> Output power 0dbm, datarate 2Mbps and LNA gain on
D_bytes(2) = &H0F
Call W_register(2)
D_bytes(1) = Write_reg + Config_nrf                         'Setup CONFIG-> PRX=1(RX_device), PWR_UP=1, CRC 2bytes, Enable CRC
D_bytes(2) = &H0F
Call W_register(2)
Return
 
Setup_tx:                                                   'Setup for TX
D_bytes(1) = Write_reg + Tx_addr                            'TX adress
D_bytes(2) = &H34
D_bytes(3) = &H43
D_bytes(4) = &H10
D_bytes(5) = &H10
D_bytes(6) = &H01
Call W_register(6)
D_bytes(1) = Write_reg + Rx_addr_p0                         'RX adress for pipe0
D_bytes(2) = &H34
D_bytes(3) = &H43
D_bytes(4) = &H10
D_bytes(5) = &H10
D_bytes(6) = &H01
Call W_register(6)
D_bytes(1) = Write_reg + En_aa                              'Enable auto ACK for pipe0
D_bytes(2) = &H01
Call W_register(2)
D_bytes(1) = Write_reg + En_rxaddr                          'Enable RX adress for pipe0
D_bytes(2) = &H01
Call W_register(2)
D_bytes(1) = Write_reg + Rf_ch                              'Set RF channel
D_bytes(2) = 40
Call W_register(2)
D_bytes(1) = Write_reg + Rf_setup                           'Setup RF-> Output power 0dbm, datarate 2Mbps and LNA gain on
D_bytes(2) = &H0F
Call W_register(2)
D_bytes(1) = Write_reg + Config_nrf                         'Setup CONFIG-> PRX=0(TX_device), PWR_UP=1, CRC 2bytes, Enable CRC
D_bytes(2) = &H0E
Call W_register(2)
Return 
حال توضیح قسمت های کد راه اندازی ماژول NRF24L01 با بسکام:

قسمت یک مربوط به تعاریف نوع میکرو و فرکانس کاری میکرو و نامگزاری آدرس های ماژول میباشد که در طی برنامه فقط نام رجیستر داده شود
در قسمت ۲ پیش تنظیمات مربوط به ارتباط اس پی آی به صورت سخت افزاری میباشد پراکه این ماژول با اس پی آی نرم افزاری کار نمیکنه
همچنین پایه هایی از میکرو که باید به ماژول وصل بشه تعریف شده واینکه اگر پورت زیر یک باشد یعنی به ولتاژ۳٫۳ یا ۵ ولت وصل بشه میکرو به صورت فرستنده کار میکنه


PORTC.3=1اما اگر به زمین وصل بشه بصورت گیرنده کار میکنه


PORTC.3=0فرستنده وگیرنده هرکدوم ۶ بایت رو میفرستند ویا میگیرن اگه فرستنده باشه به این ۶ بایت مقدار میدیم ومیفرسته و تو گیرنده اون مقداری رو که تو فرستده قرار دادیم تو ۶بایتش میگیریم
در فرستنده یک متغیر ارایه ای هست به نام

D_bytes(X)     X=0.1.2.3.4.5اما تو گیرنده به این نام هست:

B_bytes(X)     X=0.1.2.3.4.5چ
در این برنامه که تغییر دادم در فرستنده در بایت ۶ مقدار ۲ رو قرار دادموبا دستوری اون رو میفرستیم

در گیرنده هم اگر مقدار بایت ۶ برابر۲ باشه یه ال ای دی متصل به میکرو پایه زیر روشن میشه:

  
Portc.4
کته قابل توجه این هست که مهم نیست که فرستنده اول روشن بشه یا گیرنده
قسمت ۳و۴ رو که مخلوط وار توضیح دادم
قسمت ۵ مربوط به سابروتین هست که مقدار دهی به رجیستر ها و آماده سازی برای کارکرد ماژول نوشته شده
نکات راه اندازی ماژول NRF24L01 با بسکام:

برای راه اندازی این ماژول باید بین پینهای تغذیه از یک خازن با ظرفیت بالا استفاده نمود ویک سلف در مسیر تغذیه قراربگیره تا نویز روش اثر نداششته باشه

این تایپک رو گذاشتم تا استاد های محترم اشنایی کامل با راه اندازی این نوع ماژول در (BASCOM ) راه اندازی شده 


با سلام
ماژول های بدون آنتن هم با برنامه ای که در پست اول گذاشتم تست شد و کاملا جواب داد
شماتیک پیوست گردید
 

من دوتا ماژول بدون آنتن رو برای فاصله تست کردم بیشتر از 100 متر جواب داد. البته جا نداشتم و به انتهای سالن رسیده بودم وگرنه فاصله رو بیشتر هم میکردم و مطمئنا جواب میداد.
در ضمن من ترکیبی هم کار کردم جواب داد. مثلا فرستنده از ماژولای آنتن دار بود و گیرنده بدون آنتن و بالعکس و برنامه به خوبی جواب داد

فقط یک نکته اونم این که ممکنه پایه هارو چپرو بزنید و ماژول کار نکنه. من خودم در ابتدا همین اشتباه رو کردم. تصویر زیر به خوبی بیان گر پایه های ماژول هست. این تصویر توی اینترنت بود فقط من یکم دستکاریش کردم تا اشتباه برنگیز نباشه
 

ب دیدیم که معمولا یک پهنای باند رو میان به چند زیر باند تقسیم میکنن
مثلا پهنای باند 2.3 گیگ تا 2.5 گیگ میشه 0.2 گیگ (200 مگا هرتز)
و اگه پهنای باند سیگنال مدوله شده 2 مگ باشه
200 تقسیم بر 2 میشه 100، یعنی 100 تا کانال مجزا داریم!
حالا برای دسترسی به این 100 کانال یا از شیوه ی آنالوگ استفاده میشه
یا از شیوه ی دیجیتال!
در اینجا (این ماژول) قابل برنامه ریزیه!
و پهنای باند سیگنال بستگی به سرعت ارسال داده ها،کمتر از 1 مگ، 1 مگ و 2 مگه.
خب.
در همون دیتاشیت در صفحه ی 15 جدول 6 هم اطلاعات خوبی داره.
صفحه ی 25 قسمت 6.3 رو هم یک نگاهی بندازیم:

The RF channel frequency is set by the RF_CH register according to the following formula:
F0= 2400 + RF_CH [MHz]

صفحه 58 قسمت RF Channel رو نگاه کنید: از 7 بیت برای انتخاب کانال میشه استفاده کرد
2 به توان 7 میشه 128 یعنی 128 کانال مختلف قابل تنظیمه!
یعنی ما میتونیم حدود (چرا حدود؟) 128 جفت ماژول مختلف رو با هم هم زمان راه اندازی کنیم
طوری که در کار هم تداخل نداشته باشن!
 :wink:

برای اطلاعات بیشتر تاپیک زیر رو مطالعه نمایید:
http://www.eca.ir/forum2/index.php?topic=82194
به صورت سوال جوابه بیشتر. حدود 8 صفحه ...  


IRQ:
ماژول توسط این پایه به میکرو وقفه میدهد(در حالت عادی پایه high است و low شدن IRQ یکی از این حالت ها را می رساند:
1- در گیرنده یک پکت دریافت شده   2 - در فرستنده پکت بدرستی ارسال شده و ACK (تصدیق) دریافت شد    3- در فرستنده یک پکت چندبار ارسال شده(retransmition) ولی تصدیقی دریافت نکرده پس عمل فرستادن اطلاعات به درستی انجام نشده.

CE:
در حالت عادی low است وقتی بخواهیم اطلاعات با ماژول بفرستیم یا دریافت کنیم باید این پین را high کنیم تا ماژول از مد استندبای1 به active tx یا active rx برود(میتونید این پین را به VCC وصل کنید تا همیشه در حالت high باشد. ولی با وجود هدر شما فقط به PORTB.3 که وصل کنید به درستی عمل میکند(در define های اول هدر ذکر شده))


CSN:
در ارتباط spi به منظور پین CS یا ss استفاده میشود . در حالت عادی باید 1 باشد و وقتی با spi می خواهیم چیزی به ماژول بفرستیم باید آن را 0 کنیم


پروژه AVR راه اندازی ماژول NRF24L01 با کدویژن

به نام خدا

پروژه AVR راه اندازی ماژول NRF24L01 با کدویژن : تو این  پروژه AVR من ماژول NRF24L01 رو راه اندازی کردم و پروژش رو براتون قرار دادم.

پروژه AVR راه اندازی ماژول NRF24L01 با کدویژن


انواع ماژول NRF

این ماژول در 2 نوع آنتن دار و بدون آنتن وجود داه که نوع بدون آنتن (حدودا) بردش 100 متر و نوع آنتن دار 1100 متر هستش.

انواع ماژول NRF

چیپ +NRF24L01 نمونه تصحیح شده با امکانات بیشتر و دیتا ریت بالاتر چیپ NRF2401 است که توسط شرکت NORDIC در اوایل سال 2008 معرفی شد.
این چیپ  یک ماژول بسیار عالی برای ارسال و دریافت اطلاعات بدون خطا است چیزی که در ماژول های  HMTR یا حتی در RFMXX ها یا به کلی وجود نداشت یا این که مشکلات خاص خود را داشت.
مدولاسیون ارتباطی این ماژول به صورت GFSK است , همان مدولاسیونی که در تکنولوژی BLUETOOTH استفاده شده و به صورت انحصاری در دست چند شرکت بزرگ مثل BLUETOOTH  و  NORDIC SEMICONDUCTOR   و TEXAS INSTRUMENT و چند شرکت دیگر قرار دارد.
فرکانس ارتباطی این چیپ 2.4 گیگا هرتز است که این خاصیت آن ویژگی های زیادی را برای ما به ارمغان می آورد ! از جمله کوچک شدن سایز آنتن که حتی میتوان از خود PCB به صورت یک آنتن استفاده کرد , مورد دیگر هم به دلیل فرکانس بالا بسیار راحت تر از دیوار یا اجسام دیگر عبور می کند و با عث می شود که برد بیشتری هم به ما بدهد , می توانید فرکانس RFM12 یا HMTR را با این چیپ مقایسه کنید ! می بینید که فرکانس این سری از ماژول ها حداقل چند برابر آن ها است.
این چیپ به صورت دو طرفه کار می کند و در کل شما فقط به 2 عدد از این چیپ ها برای ارتباط لازم دارید (مشابه RDM12)
دیتا ریت این چیپ حداکثر 2 مگا بیت بر ثانیه است که می توان از آن برای انتقال اطلاعات سنگینی مشابه صوت و یا حتی ویدئو استفاده کرد.


توضیحات ماژول + NRF24L01 سری آنتن دار

ویژگی های خاص :

  1. طبقه تقویت کننده گیرنده و فرستنده داخلی
  2. چیپ با کیفیت تایوانی (ver 3.1)
  3. حداکثر دیتا ریت تا 2 مگا بیت بر ثانیه در فضای باز
  4. جریان مصرفی بسیار پایین (12 میلی آمپر)
  5. دارای رگولاتور داخلی و بی نیاز از تأمین ولتاژ های مختلف
  6. مجهز به تکنولوژِی پیشرفته SHOCKBURST
  7. قابلیت اتصال چند ماژول به هم از طریق بی سیم و ایجاد یک شبکه محلی
  8. قابلیت تحمل ولتاژ 5 ولت بر روی پین های دیتا
  9. سایز کوچک چیپ و نیاز به قطعات خارجی کم


توضیحات ماژول + NRF24L01 سری بدون آنتن

ویژگی های خاص:

  1. حداکثر دیتا ریت تا 2 مگا بیت بر ثانیه در فضای باز
  2. جریان مصرفی بسیار پایین (12 میلی آمپر)
  3. دارای رگولاتور داخلی و بی نیاز از تأمین ولتاژ های مختلف
  4. محدوده ولتاژ تغذیه چیپ از 1.9 تا 3.6 ولت
  5. مجهز به تکنولوژِی پیشرفته SHOCKBURST
  6. قابلیت اتصال چند ماژول به هم از طریق بی سیم و ایجاد یک شبکه محلی
  7. قابلیت تحمل ولتاژ 5 ولت بر روی پین های دیتا
  8. سایز کوچک چیپ و نیاز به قطعات خارجی کم


موارد استفاده:

  1. قطعات کامپیوتری وایرلس مانند موس یا کی بورد یا قطعات دیگر
  2. هدست های بیسیم مانند VOIP HEADSET
  3. دسته های بیسیم کنسول های بازی مانند PS3
  4. ساعت های ورزشی یا سنسور ها
  5. ریموت کنترل برای مصارف الکترونیکی
  6. اتوماسیون خانگی(خانه هوشمند) که فرضا تمامی ارتباطات الکتریکی فرضا برای روشنایی به صورت بیسیم می باشد
  7. در شبکه هایی که نیاز به یک ارتباط وایرلس بسیار کم مصرف است
  8. سیستم های مسیر یاب مانند GPS
  9.  اسباب بازی ها !
  10. و در بسیاری از پروژه های متنوع صنعتی و غیرصنعتی که نیاز به یک ارتباط بی سیم مطمئن می باشد.


پروژه AVR

این از مدار ماژول گیرنده

 میکروکنترلر


این از کد های ماژول گیرنده


این از مدار ماژول فرستنده

 پروژه AVR


اینم از کد های ماژول فرستنده


ترتیب پایه های ماژول NRF

در زیر ترتیب پایه های برای ماژول NRF در دو نوع آنتن دار و بدون آنتن مشاهده میکنید که مثل هم هستن.

 راه اندازی ماژول NRF24L01


 ماژول فرستنده و گیرنده


عکس پروژه + فیلم پروژه

فعلا درگیر کار های PCB ایش هستم…..(دنبال وسایل مورد نیاز!!!!) و منتظرم تا pcb ایش رو درست کنم و مدار رو روش ببندم و بعد فیلم بگیرم…..مدار رو من عملی بستم و جواب هم داده….لذا از این بابت نگران نباشید.


 دانلود پروژه+دیتاشیت+بقیه مخلفات


راه اندازی ماژول NRF24L01 با بسکام


https://forum.sparkfun.com/viewtopic.php?t=14210

http://maniacbug.github.io/RF24Network/files.html

https://www.insidegadgets.com/2012/08/22/using-the-nrf24l01-wireless-module/​


دانلود آموزش فارسی  راه اندازی ماژول وایرلس NRF24L01

+کدهای گیرنده و فرستنده+کتابخانه+پاورپوینت توضیحات و شماتیک 

در قالب یک پروژه کاملا عملی


  • ShahBaz