برق، الکترونیک، الکتروتکنیک، مکاترونیک، پزشکی، کشاورزی

برق، الکترونیک، الکتروتکنیک، مکاترونیک، پزشکی، کشاورزی و

برق، الکترونیک، الکتروتکنیک، مکاترونیک، پزشکی، کشاورزی

برق، الکترونیک، الکتروتکنیک، مکاترونیک، پزشکی، کشاورزی و

داده هایی در مورد برق، الکترونیک، الکتروتکنیک، مکاترونیک، پزشکی، کشاورزی و

تبلیغات
آخرین نظرات

۴۵ مطلب با موضوع «برق الکترونیک رباتیک :: آردوینو و سایربردها» ثبت شده است

پول آپ (Pull-up) و پول دان(Pull-down) چیست؟

ShahBaz | شنبه, ۳۰ مرداد ۱۳۹۵، ۰۹:۰۸ ب.ظ

پول آپ (Pull-up) و پول دان(Pull-down) چیست؟

توسط sinaset » پنج شنبه 23 مهر 1394 09:43

بنام خدا
باسلام

پول آپ (Pull-up) و پول دان(Pull-down) چیست؟

حتما تا بحال این اصطلاح را مکرر شنیده اید! "یک مقاومت پول اپ براش بزارید.!" و بدرستی عملکرد ان را متوجه نشده اید.

اما پول آپ و پول دان به زبان ساده.

معمولا وقتی که ما پایه ی از میکروکنترلر داشته باشیم،که بخواهیم آن را برای عملکردی به کلید وصل کنیم. آن را پول آپ یا پول دان میکنم.چرا؟! چون درصورتی پول آپ یا دان نکرده باشیم، نویزهای موجود در اطراف. بر روی پایه میکروکنترولر تاثیر گذشته! و آن را خاموش و روشن میکند! و این اصلا خوب نیست.

برای همین ما معمولا یک مقاومت بین 4.7 تا 10 کیلو اهم را از ولتاژ مخالف عملکرد پایه میکرو،بر روی ان میگذاریم ! شاید توضیحات کمی گیج کننده بیاید. مبحث رو بیشتر باز می کنیم.

چرا مقاومت 4.7 تا 10 کیلو اهم ؟!

چون اولا کمتر از 4.7 کیلو اهم ،ممکن است باعث اتصال کوتاه شود! و اگر هم بیشتر از 10 کیلو اهم باشد،ممکن است دیگر نویز ها را از بین نبرد!(یا تاثیرش کم باشد)

معمولا هرکسی که مداری طراحی کرده باشد.خودش میزان مقاومت پول آپ و پول دان رو می گوید. اما معمولا برای انتخاب مقاومت پول اپ و دان از بین 4.7 تا 10 کیلو اهم، میارشان میزان احتمال نویز موجود در محیط و جریان موجود بر روی مدارست.

*بیشتر مواقع مقاومت 10 کیلو اهم روی پایه ها گذاشته میشود

ولتاژ مخالف عملکرد پایه میکروکنترولر،دقیقا چیست؟!

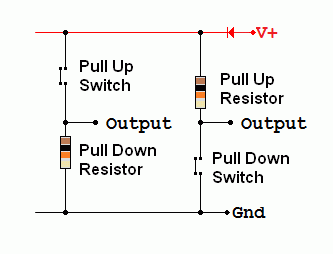
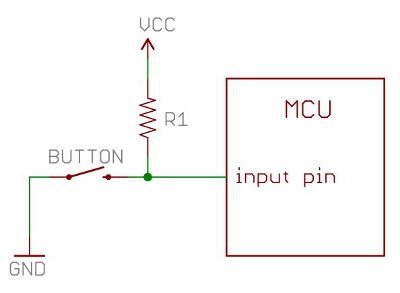
به عنوان مثال تصویر زیر رو در نظر بگیرید.
در مدار بالا،وقتی که یک ولتاژ منفی(در تصویر GND) به کمک (BUTTON) برای میکروکنترولر فرستاده میشود، یک عملکرد خاص اتفاق می افتد!
*یعنی در میکروکنترولر اینطور تعریف شده که وقتی پایه ( به عنوان مثال پایه 20) وضعیتش 0 شد. LED را روشن کن .
حالا ما میایم، این سمت کلید (سمتی که پایه خروجی کلید به پایه 20 میکرو وصله) یک جریان مثبت! (یعنی وضعیت 1 ) را به مقاومت پول آپ وصل می کنیم. اکنون این جریان پول آپ (که یک ولتاژ ضعیف است) روی پایه 20 میکروکنترولر افتاده و از گرفتن نویز بر روی آن پایه جلوگیری می کند.ضمن اینکه وضعیت پایه را 1 نگه داشته(دقیقا عکس دستور که در خط بالا* اشاره کردیم ).
و در زمانی که ما کلید را بفشاریم.جریان زیادی منفی وارد شده از آن ولتاژ مثبت ضعیف شده پول آپ ، نیز به راحتی میگذرد و هیچ گونه اتصالی کوتاهی اتفاق نمی افتد(اتصال کوتاه بصورت خیلی خیلی ریز اتفاق می افتد، که البته تاثیری ندارد،بطوری که می توان از ان صرف نظر کرد)
وقتی که ما ولتاژ مثبت روی پایه مد نظرمان قرار دهیم،اصطلاحا می گوییم پول آپ Pull-Up انجام داده ایم
----
وقتی که ما ولتاژ منفی روی پایه مد نظرمان قرار دهیم،اصطلاحا می گوییم پول دان Pull-down انجام داده ایم.
باتشکر.
"قرآن"(کلام خدا) ...راه سعادت و خوشبختی.

4 کاربر از این پست سپاسگزاری کرده اند

  • ShahBaz

arduino arm 32 bit -Genuino ZERO

ShahBaz | جمعه, ۱۸ تیر ۱۳۹۵، ۱۱:۳۳ ب.ظ

Overview
Genuino Zero sets a new standard in processing power for Genuino boards, with a 32-bit ARM processor running at three times the speed of the Uno. The Genuino Zero offers everything you need to release your creative potential: advanced audio and analog processing capabilities, low power consumption, and a real-time clock, all at a convenient price. Internet of Things, robotics applications, art installations, and other sophisticated projects will also benefit from the Zero's capabilities.

Technology
The Genuino Zero is powered by Atmel’s SAMD21 MCU, which features a 32-bit ARM Cortex® M0+ core, clocked at 48MHz. This board has six analog inputs that can be configured for 10 or 12 bit sampling and also offers a Digital to Analog Converter (DAC) with 10 bit resolution for true analog signal output. Using Genuino Zero with Atmel Studio, you can use Atmel’s Embedded Debugger (EDBG), which provides a full debug interface without the need for additional hardware, making it significantly easier to debug software. EDBG also supports a virtual COM port that can be used for device and bootloader programming. To compare this board to the current, past or outdated boards see the Comparison Page.

  • ShahBaz

اینرنت اشیا

ShahBaz | پنجشنبه, ۲۷ خرداد ۱۳۹۵، ۰۲:۱۷ ب.ظ

✔️Contiki (The Operating System for Internet of Things)

📌آیا هرگز درباره سیستم عامل Contiki شنیده اید!؟

سیستم عامل Contiki هم مانند لینوکس و ویندوز است، با این تفاوت که این سیستم عامل با اهداف خیلی خاص و با تمرکز بر Internet of Things-IOT طراحی شده است.
عملکرد این سیستم عامل شامل مدیریت برنامه ها و فرآیندها، مدیریت منابع، مدیریت حافظه و ارتباطات دستگاه ها است. Contiki یک پروژه نرم افزاری متن باز است. آنچه که Contiki را از سایر سیستم عامل های مشابه مانند TinyOS متمایز می سازد قدرت انعطاف پذیری است که در اختیار برنامه نویسان قرار می دهد.

♦️در آینده نزدیک دنیای فناوری از این سیستم عامل بیشتر خواهید شنید.

لازم به ذکر است، Internet of Things - IOT سیستمی از دستگاه های محاسباتی، ماشین های دیجیتالی و مکانیکی، اشیا، حیوانات و انسانها است که به هر کدام یک شناسه منحصر بفرد اختصاص می یابد. در این سیستم ، انتقال داده از طریق شبکه و بدون تعامل انسان با انسان و یا انسان با کامپیوتر صورت می گیرد.

  • ShahBaz

Arduino Nano v3.0 clones (How-to & Review)

ShahBaz | يكشنبه, ۴ بهمن ۱۳۹۴، ۰۴:۱۷ ب.ظ

Arduino Nano v3.0 clones (How-to & Review)

wpid-wp-1441446494076.jpg

If you need a breadboard-friendy, well documented and supported Arduino board, your best choice is a Nano. Unfortunately an original Arduino Nano could cost you around $30 plus shipping so it makes sense to search for an alternative source. There are also some chinese clones that are around five times cheaper, even with worldwide shipping.

But wait! There’s always a reason why a clone of something is cheaper than the original product. In this case there can be two pitfalls you need to know about.

The bad

  1. Sometimes the FTDI chip which makes the USB communication possible is a counterfeit. This could cause problems when you install the official FTDI drivers and they just refuse to work.
  2. Usually there is no bootloader on the microcontroller. You need to upload it yourself and that means you need to have an appropriate programmer on hand.

Update 2015.12.15

I don’t recommend these clones anymore. Check out my other post about a clone based on the USB chip CH340G.

Using a counterfeit FTDI chip

If you are interested in the differences between a real and fake chip check out this article with wonderful microscope images. These fake chips used to work perfectly just as the original ones.

FTDI FT232RL real vs fake

Image courtesy of ZeptoBars

According to Wikipedia it all started in September 2014 when FTDI released a new driver that could detect fake chips and bricked them by setting their product id to “0000”. This driver was withdrawn from Windows Update but many devices got bricked already and the driver was still accessible for a long time.

FTDI stated that they were working on an updated version of the driver “which notifies the user of non-genuine FTDI products in a non-invasive manner”. Well, this driver was released in July and I was shocked what FTDI considers to be non-invasive:

Capture

Basically, with the new driver, all you can receive from the fake chip is “NON GENUINE DEVICE FOUND!”. The funny thing is that you only see this message when the device is transmitting. So if you have a new clone with an empty ATmega, you don’t really see anything suspicios. It will appear in the device manager correctly but every time you press upload, avrdude will fail with the following:

stk500_recv(): programmer is not responding

You can only see the “NON GENUINE DEVICE FOUND!” message if you use an ISP programmer to upload a program which transmits something with UART.

So if you are just starting to play with Arduino clones  make sure that you are NOT using the latest drivers.

And now lets see how to get to a working Arduino nano from the worst possible scenario: bricked device (pid=0000), latest FTDI drivers and missing bootloader.

  1. First download the following files:
  2. Make sure that the device appears in Device Manager and is recognized correctly. Double-click the device > Details > select Hardware Ids property and it should say “PID_0000” somewhere.
  3. Open up FT_Prog and select DEVICES > Scan and parse. It should display your device like this:
    ftdi_0000
  4. Click on “Chip details” and change the PID back to 6001, then click DEVICES > Program and program the device with the new PID. Now the chip itself is in its original state, we only need to remove the new driver and make sure it never comes back.
    ftdi_6001
  5. Disable automatic updates of drivers in Windows. This is extremely important, do not skip this step!
    It might be slightly different for each Windows version but in Windows 10 open up Control Panel and navigate to System and Security > System > Advanced system settings > Hardware tab > Device Installation Settings. Make sure you have “No, let me choose what to do” and “Never install driver software from Windows Update” selected.
    windows_update_driver
  6. Open up CDMUninstallerGUI, click “Add” to add the device to the list and click “Remove”. This removes every single instance of the FTDI drivers.
  7. Restart your computer.
  8. Open up Device Manager and you should see that the Arduino is not longer recognized as a virtual COM port.pid_0000_device
  9. Install the “old” drivers manually.
  10. Connect the ISP programmer to the nano.
  11. Burn the bootloader with Arduino IDE.
  12. Remove the ISP programmer and connect again with mini USB.

After this, you should have a fully functional and future-proof Arduino Nano clone.

  • ShahBaz

کنترل از طریق موبایل و کامپیوتر

ShahBaz | جمعه, ۱۸ دی ۱۳۹۴، ۰۲:۳۶ ب.ظ

شاید برای شما هم پیش آمده باشد که در پروژه های میکروکنترلری بخواهید مدارتان را از طریق گوشی تلفن همراه یا کامپیوتر کنترل کنید یا داده هایی را از مدارتان دریافت کنید.
بدون شک یکی از ساده ترین راه هایی که پیش روی شماست ، تبادل اطلاعات بوسیله ی بلوتوث ( Bluetooth ) است. در نگاه اول شاید کمی پیچیده به نظر برسد، اما بوسیله ی ماژول بلوتوث hc05 یا hc06 به سادگی می توانید این کار را انجام دهید. به کمک این ماژول بلوتوث شما با استفاده از پروتکل UART می توانید اطلاعاتی را از طریق بلوتوث دریافت یا ارسال کنید.
ماژول بلوتوث HC-05 در واقع یک مبدل بلوتوث به سریال است. این ماژول به سادگی در بازار قابل تهیه است. دقت نمایید این ماژول به صورت SMD می باشد اما برای سهولت استفاده اغلب در بازار مدل هایی یافت می شود که ماژول SMD بر روی برد مبدل لحیم شده است و قطعات مورد نیاز جهت راه اندازی نیز بر روی برد مبدل قرار داده شده است ، با استفاده از این نوع ماژول ها تنها کافیست پین های تغذیه ۵ ولت ( VCC و GND ) و RX و TX(خطوط ارسال و دریافت داده UART ) را متصل نمایید. همچنین گفتنی است این نوع ماژول به دلیل تبدیل نوع پایه ها به پین هدر به سادگی بر روی برد بورد قابل نصب و راه اندازی است.

@EEFZIR
http://eefz.ir

  • ShahBaz

تاکومتر با اردوینو

ShahBaz | چهارشنبه, ۱۶ دی ۱۳۹۴، ۰۳:۲۲ ب.ظ
  • ShahBaz

آردوینو با طعم آرم

ShahBaz | چهارشنبه, ۱۶ دی ۱۳۹۴، ۰۱:۲۳ ب.ظ

MEET THE NEW MKR1000 AND WIN IT IN AN AMAZING CONTEST!

Zoe Romano — December 9th, 2015

MKR1000_web

It’s a great pleasure to introduce the new member of the Arduino and Genuino family: MKR1000 is a powerful board that combines the functionality of the Zero and the connectivity of the Wi-Fi Shield.

It’s based on the Atmel ATSAMW25 that is part of the SmartConnect family of Atmel Wireless devices, specifically designed for IoT. It offers the ideal solution for makers seeking to add Wi-Fi connectivity with minimal previous experience in networking.

The new board will be available for purchase from February 2016 but starting today #1000 MKR1000 can be won in the World’s Largest Arduino Maker Challenge in collaboration with Hackster.IO and Microsoft.

Maker_Contest_blogpost

We want to celebrate the maker community so we thought there’s no better way to do that than encourage inventors, artists, makers, hobbyists or professionals and developers to create on Arduino. The contest is very flexible – choose anything you want to build from environmental sensors to gaming, augmented reality, robotics or UAVs using the power of Arduino.cc boards and Windows 10.

The 1,000 makers who submit the best project ideas will receive the newly released Arduino MKR1000 (US only) and Genuino MKR1000 (Outside US) boards. Then three finalists submitting the best completed projects will be awarded with a fully-funded trip to Maker Faire Shenzhen, New York or Rome; a chance to present their creation at the Microsoft and the Arduino and Genuino booths; a professional video production of the project; and a whopping $500 gift certificate to Adafruit.

Contest starts today,  December 9th 2015, when participants can sign up or log into Hackster and enter to win the new MKR1000 board by pitching the idea. Idea submissions close on January 15, 2016 at 11:59 PM (PT).

Save the date and participate now!

  • ShahBaz

ماژول Curie در اردوینو

ShahBaz | دوشنبه, ۱۴ دی ۱۳۹۴، ۰۹:۲۲ ب.ظ

ماژول Curie از اینتل برای اولین بار در یک برد آردوینو مورد استفاده قرار خواهد گرفت

ماژول Curie از اینتل برای اولین بار در یک برد آردوینو مورد استفاده قرار خواهد گرفت

در نمایشگاه CES 2015 بود که اینتل از Curie پرده برداشت؛ سیستم-بر-چیپی به اندازه یک دکمه لباس که طراحی شده بود تا در محصولات پوشیدنی مورد استفاده قرار گیرد. در آن زمان، مشخص نگشت که اولین محصولی که از این ماژول استفاده می کند چیست.

اکنون ولی مشخص شده که اینتل این چیپست را در برد جدید آردوینو به نام Arduino 101 به کار گرفته است. تکنولوژی بکار رفته از سوی اینتل در Curie قابل تقدیر است؛ از بلوتوث LE (مصرف انرژی پایین) گرفته تا شتاب دهنده ای برای تشخیص حرکات و سنسوری ۶ محوره و ترکیبی از شتاب سنج و ژیروسکوپ. در ادامه با دیجیاتو همراه باشید.

سخت افزار برد های آردوینو متن باز است و پیش از این از پردازنده های با معماری ARM در آنها استفاده می شد. پروژه ساخت برد یاد شده از سال ۲۰۰۵ آغاز گشت و چنین محصولاتی معمولا به دانش آموزان کمک می کنند تا بتوانند پروژه های تعاملی خود با محیط اطراف را به شکلی ساده تر انجام دهند.

1016_Arduino101_-w600

نکته جالب اینکه قیمت برد آردوینو کمتر از ۳۰ دلار اعلام شده اما در ابتدای سال ۲۰۱۶ به دست علاقمندان خواهد رسید. همانطور که گفتیم چنین بردی بیشتر برای نوجوانان تولید می شود تا به پروژه های کد نویسی علاقه پیدا کنند و بتوانند با برد و مدارهای الکتریکی آشنایی لازم را به دست آورند.

اکنون ولی باید توجه داشت که اضافه شدن ماژول Curie به برد یاد شده باعث می گردد تا قابلیت های آنها بسیار بیشتر از پیش شوند. برای مثال شخصی که در حال انجام یک پروژه با برد Arduino است، اکنون می تواند برخی امور را از طریق تلفن هوشمند خود و به واسطه بلوتوث کنترل نماید.

  • ShahBaz